Tag: Photo Booth Lighting

  • Lighting 101: How to Light Your DIY Booth for “Low Light” Venues

    Lighting 101: How to Light Your DIY Booth for “Low Light” Venues

    The days of harshly lit, sterile-looking event spaces are over. A major, undeniable shift has taken place in the event industry, particularly in weddings and milestone celebrations: the rise of the atmospheric, low-light ceremony and reception. This aesthetic, characterized by hundreds of flickering candles, string lights, dramatic uplighting, and strategically placed spot lamps, creates an air of romance, intimacy, and sophisticated moodiness that guests adore. It’s a photographer’s dream for ambiance, but it can quickly become a photo booth operator’s nightmare.

    If you’re running a DIY photo booth like ZillaBooth…a system celebrated for its portability and professional-grade results…you know that great photos rely on one thing above all else: great lighting. When you introduce a powerful, non-diffused light source like a standard camera flash into a carefully curated low-light environment, you risk blowing out the atmosphere. However, if you rely on the venue’s dim lighting, you’ll end up with dark, grainy, blurry, and frankly unusable photos.

    The good news? You don’t have to choose between a moody ambiance and delivering stellar photo booth strips. By understanding the fundamentals of lighting control and leveraging specific tools with your ZillaBooth, you can conquer any dark reception hall and turn the low-light setting into an artistic advantage. We’re going to break down two essential, yet distinct, strategies for achieving flawless results: the consistent, soft glow of the ring light and the high-contrast drama of the Pro “Flash Control.”

    Strategy 1: The Ring Light … Simple, Soft, and Effective

    For operators seeking a classic, flattering, and instantly recognizable photo booth look, pairing your ZillaBooth with a dedicated, high-quality ring light is the best strategy. The ring light offers a consistent, diffuse, and shadow-minimizing light source that is perfect for low-light conditions because it adds light without destroying the existing mood.

    Guests enjoying a DIY photo booth at an event — section 1

    Selecting the Right Ring Light Not all ring lights are created equal. When operating in a low-light venue, you need control and power. Look for a model that meets these specifications:1. Large Diameter (18-20 inches): A larger light source is a softer light source. A wider diameter ensures the light wraps around the subject’s face, reducing harsh shadows and creating the signature, attractive circular catchlights in the eyes. 2. Adjustable Color Temperature (Bi-Color): This is non-negotiable for working in moody venues. Low-light spaces often use warm (amber/yellow) tungsten or LED lighting (typically 2700K-3500K). To prevent your photo booth subjects from looking blue or cold, you need to match the ambient warmth. A bi-color ring light allows you to dial in the color temperature from cool white (daylight, ~5500K) all the way down to a warm tungsten glow (~3200K). Match the light to the venue’s color scheme for a cohesive, professional look. 3. Variable Dimming: Being able to adjust the brightness from 10% to 100% is crucial. In a very dark room, you may need it at 80% or higher. If the venue has some existing light, you might only need 30% to serve as a flattering fill light.

    Setting Up the Ring Light with ZillaBooth

    Integrating the ring light with the ZillaBooth is straightforward and results in a beautiful, consistent product. * Mounting: If your ZillaBooth stand supports it, mount the ring light directly around the camera lens. This ensures the light is perfectly centered for that iconic, shadowless look. If it requires a separate stand, position the ring light as close as possible to the lens axis.

    The closer the light is to the camera, the softer the final image will appear. * Dialing In the Power: The key to using a ring light in a low-light venue is consistency . Once you’ve set the color temperature to match the venue’s warmth, take a few test shots. Increase the power until the subject’s face is brightly and evenly illuminated, but stop before the light begins to “spill” too heavily onto the background, which would destroy the dark, moody ambiance. The goal is to isolate the subject.

    Diagram illustrating a photo booth workflow for Lighting 101: How to Light Your DIY Booth for

    Pro Tip: The Power of Proximity


    Remember the inverse square law of light: light falls off rapidly as the distance from the source increases. By positioning the ZillaBooth and ring light system a comfortable distance from the background (say, 5-8 feet), the ring light will brilliantly illuminate the subjects while the background remains in the relative darkness, enhancing the cozy, dramatic feel of the low-light venue. The soft, even light of the ring light is the best way to guarantee flattering, high-quality images while respecting the intentional darkness of the room.

    Strategy 2: The Pro “Flash Control” … High-Contrast Drama

    While the ring light offers soft consistency, there are times when you need raw, uncompromising power, especially if you want to capture the dynamic energy of a packed, dark dance floor or if you encounter a space that is so dark that a ring light alone introduces too much noise or motion blur. This is where the advanced functionality of the ZillaBooth Pro (or a similar manual control app) and its “Flash Control” feature becomes indispensable.

    Guests enjoying a DIY photo booth at an event — section 3

    Understanding the Forced Flash Aesthetic In auto-mode, a standard camera flash tries to balance the flash with the dim ambient light, which often results in a slow shutter speed. Slow shutter speeds in a photo booth environment guarantee motion blur…ruined photos. The Pro “Flash Control” allows you to manually force the flash to fire at full power, regardless of the ambient lighting. This accomplishes two critical things:1. It freezers motion: A powerful, brief flash allows the camera to use a fast shutter speed (e.g., 1/160th of a second), which completely eliminates motion blur from dancing or moving guests. The subject is frozen perfectly in time. 2. It creates high contrast: By forcing a fast, powerful, and undiffused flash, you create a dramatic, high-contrast look often called the “paparazzi aesthetic” or “editorial flash.” The subject is intensely illuminated, while the rest of the dark room falls away into deep, black shadows. This aesthetic perfectly complements the drama of a low-light venue.

    How to Leverage ZillaBooth Pro’s Flash Control

    The core principle is to take the flash function out of automatic control. * Access the Pro Settings: Navigate to the advanced settings menu in your ZillaBooth Pro application. Locate the flash icon or “Flash Control” setting.

    • Set to Manual “Force On”: Change the setting from “Auto” to “Manual Force On” or simply “On.” This ensures the flash fires with every single shot, giving you complete control over the exposure.
    • Adjusting Shutter and ISO: Since the flash is now your primary light source, you can manually set the camera’s ISO (sensitivity) to a low number (e.g., ISO 100 or 200) to virtually eliminate digital noise (graininess). You can also set a fast, safe shutter speed (e.g., 1/125th) to guarantee sharpness. The flash exposure controls the subject, and the fast shutter speed controls the blur.
    Photo booth setup at an event for Lighting 101: How to Light Your DIY Booth for

    Pro Tip: The Drag the Shutter Technique (Advanced)

    If you want to capture some of the beautiful ambient background light (like those string lights or candles) while still freezing the subject, use a technique called “dragging the shutter.”1. Keep the flash “Force On.”

    • Slow the shutter speed slightly (e.g., from 1/125th down to 1/30th or even 1/15th of a second).
    • The flash will still fire, freezing the subject perfectly, while the slower shutter speed allows the camera to record a bit of the colorful, streaky background ambient light. The result is a dynamic, high-energy photo…a sharp subject with a moody, artistic, slightly blurred backdrop. This is a highly professional technique that works wonders in dark spaces.
    Diagram illustrating a photo booth workflow for Lighting 101: How to Light Your DIY Booth for

    Bonus Tips for Flawless Dark Venue Booths

    Mastering the light is only part of the equation; placement and preparation are equally important when dealing with the challenge of low-light venues. * Background Management: In a dark venue, the background can be a messy distraction. If you’re not using a dedicated backdrop, place the ZillaBooth against a dark, featureless wall or an area where the lighting is particularly sparse. This lets your lighting strategy (whether ring light or forced flash) isolate the subjects and allow the rest of the room to fade away, enhancing the portrait-like quality of the photos.

    • Avoid Competing Light Sources: Position the photo booth away from any venue spotlights, aggressively bright exit signs, or large windows. These competing light sources can confuse the camera and create wildly inconsistent exposures in your shots. You want your controlled light source to be the only significant light source on your subject.
    • Use the Prop Tray Strategically: Glitter, sequins, and reflective surfaces are your friends when working with direct light. Encourage the use of shiny props. The ring light or the forced flash will bounce aggressively off these materials, creating an explosive, dynamic effect that adds visual energy to the photo, which is especially important in an otherwise dark setting.
    • Lens Maintenance: Dust or smudges on the camera lens are invisible in bright light but become glaringly obvious when a powerful flash or ring light hits the glass. Before the event and periodically throughout, give your lens a quick wipe with a microfiber cloth. A clean lens ensures maximum light transmission and crystal-clear results.The modern low-light event is an aesthetic challenge, but it’s also a powerful opportunity. By implementing the soft, consistent light of a high-quality ring light or the dramatic, sharp contrast of the Pro “Flash Control” technique, you transform the ZillaBooth from a simple camera system into a sophisticated lighting tool. You no longer have to compromise the beauty of the venue for the quality of the photo…you can leverage the darkness to make your guests truly stand out. Go forth and master the light, even when there is almost none.
  • Direct Flash is Back: How to Nail the “Paparazzi Aesthetic” with Your iPhone

    Direct Flash is Back: How to Nail the “Paparazzi Aesthetic” with Your iPhone

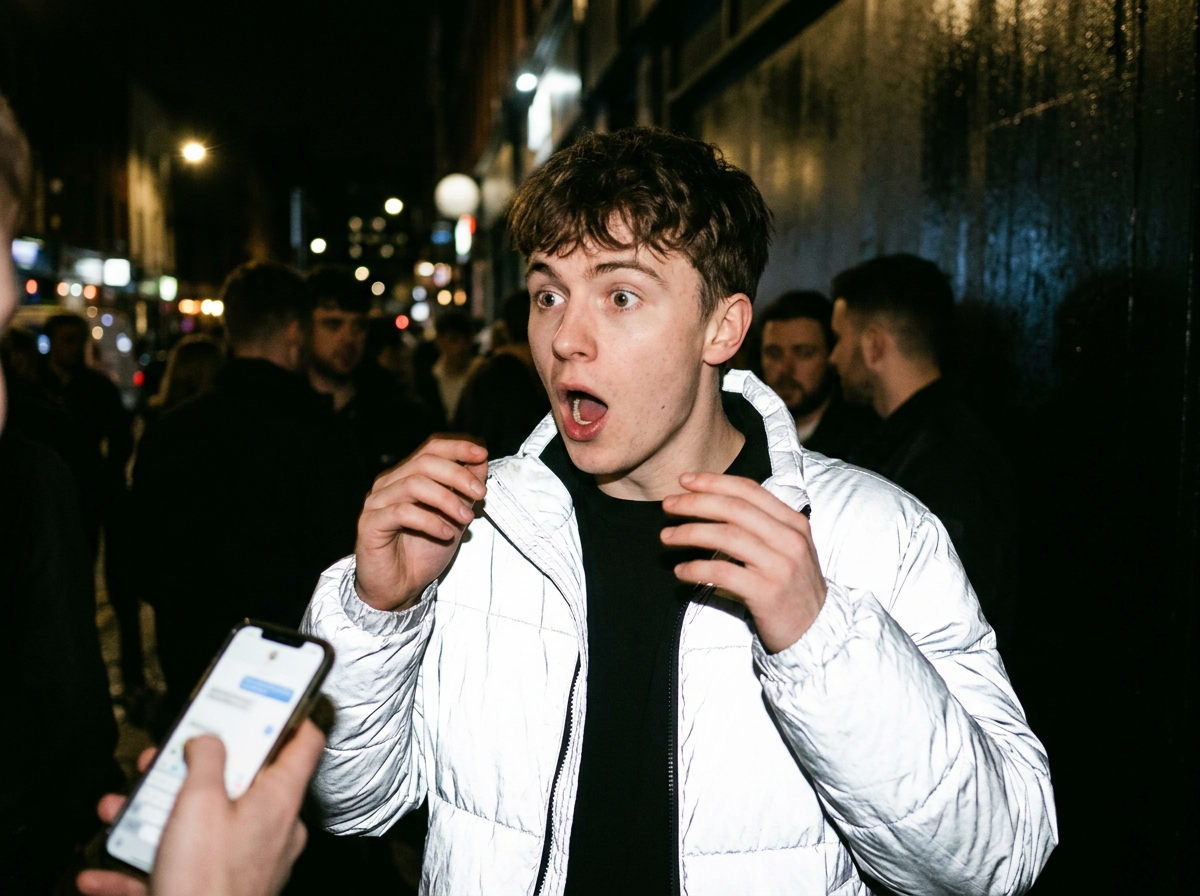
    The return of the harsh, unfiltered flash is one of the most surprising and dominant photography trends of 2026. After years of chasing soft, natural light, carefully editing out shadows, and defaulting to our phone’s automatic low-light settings, we’ve collectively thrown out the rule book and embraced the high-contrast, often unflattering aesthetic of the direct flash photograph. It’s not just a passing fad; it’s a full cultural moment, and if you haven’t yet mastered the look, it’s time to learn how to weaponize your phone’s flash to achieve the celebrated “paparazzi aesthetic.”

    The ‘Paparazzi Aesthetic’ Explained

    Why is this formerly dreaded look suddenly everywhere? The appeal of the direct flash is rooted deeply in nostalgia and a contemporary craving for authenticity. It evokes a very specific time and place: the late 1990s and early 2000s, an era when inexpensive point-and-shoot digital cameras and disposable film cameras reigned supreme. These devices were known for a simple, non-diffused, front-facing flash that cast deep, unmistakable shadows, often blew out skin tones, and created dramatic highlights.

    When we look at a direct flash photo today, we aren’t just seeing a picture; we’re experiencing a piece of cultural history. It’s the look of celebrity street style from tabloid magazines, grainy red carpet shots, and late-night party photos taken in dimly lit clubs. It carries a sense of grit, an unfiltered, raw energy that contrasts sharply with the meticulously curated, sun-drenched perfection that has dominated social media for the past decade. It’s the visual equivalent of lo-fi music…imperfect, slightly rebellious, and immediately evocative.

    In a digital landscape saturated with highly polished, AI-assisted images, the harshness of direct flash offers a counterpoint. It screams “This was taken right now and no one had time to adjust the lighting.” It feels real, spontaneous, and unposed, even when the subject is perfectly styled.

    This high-contrast, almost brutal honesty is what makes the aesthetic so compelling to a generation tired of digital artifice. The shadows are part of the story, the blown-out highlights are a badge of authenticity, and the intense focus on the subject creates an undeniable sense of drama, placing the viewer right in the middle of a high-energy, secretive moment.

    Tutorial: Mastering the Look with Your iPhone and ZillaBooth Pro

    While your iPhone’s standard camera app is incredibly smart and tries to prevent the harsh look you’re after, replicating the “paparazzi aesthetic” requires forcing the camera to behave like a primitive point-and-shoot. The key is manual control over the flash, which is where a dedicated professional camera app like ZillaBooth Pro becomes essential.

    Analog film photograph of section 1 related to Direct Flash is Back: How to Nail the

    Step 1: Download and Open ZillaBooth Pro If you haven’t already, download the ZillaBooth Pro application. This app gives you granular control over your iPhone’s camera settings, including the often-locked flash function that the native camera app manages automatically.

    Step 2: Locate the Flash Control Once in the ZillaBooth Pro interface, look for the flash icon…usually a small lightning bolt. In the standard iPhone app, this is often set to ‘Auto’ or ‘Off.’ Within ZillaBooth Pro, you’ll see three primary settings for the flash: Auto, On, and Off.

    Step 3: Activate Manual “Flash On” This is the crucial step that differentiates a standard photo from an aesthetic one. Set the flash control to Manual “Flash On”. This forces the flash to fire at its maximum intensity every single time you press the shutter, regardless of how bright the scene actually is. This is the secret sauce for achieving the aggressively lit, high-contrast effect. You want the flash to overpower the ambient light…even if there is plenty of natural light…which is what creates those signature deep, black shadows and the dramatic look on your subject’s face or outfit. The lack of diffusion is key; the iPhone’s tiny flash is perfect for this, as it acts like the unrefined light source of a classic point-and-shoot.

    Step 4: Select Your Subject and Background The paparazzi aesthetic works best when there is a strong contrast between the subject and the background. * The Subject: The flash will highlight texture, makeup, and fabric dramatically. Encourage your subject to look directly at the camera for the classic, direct celebrity confrontation look, or let them move naturally in a chaotic setting to maximize the perceived spontaneity. * The Background: Look for settings with deep shadows or busy, interesting textures, like a dark brick wall, a crowded bar, or a street scene at night. The harsh flash will powerfully cut your subject out of the darkness and push the background into deep shadow, enhancing the drama and sense of isolation common in this aesthetic.Step 5: Adjust Exposure and Focus (Optional, but Recommended for Maximum Effect) Even with the flash forced on, you can fine-tune the drama using ZillaBooth Pro’s manual controls. * Exposure: While the flash is active, try slightly underexposing the shot using ZillaBooth Pro’s manual exposure slider. This will make the shadows even deeper and the highlights of the flash pop even more aggressively, reinforcing the “spotlight” effect. * Focus: Use the manual focus control to ensure your subject is razor-sharp. The extreme contrast created by the direct flash demands perfect focus to maintain the image’s overall impact.Step 6: Shoot and Review Take the shot. The result should be a high-contrast image with a distinct, vintage-digital feel. Pay attention to the shadows…they should be harsh, dark, and clearly defined behind your subject. Look for the reflective qualities in eyes, jewelry, or glossy fabrics, which should gleam intensely under the direct, undiffused light.

    Pro Tips for Paparazzi Perfection

    To elevate your direct flash game beyond a simple snapshot and into a refined piece of editorial-style content, keep these professional tips in mind:1. Embrace the Red Eye: Unlike conventional photography where red-eye is a flaw to be corrected, in the paparazzi aesthetic, it can be a feature. Don’t worry about editing it out. It adds to the raw, uncontrolled, and nostalgic feel of a genuinely spontaneous late-night flash photo.

    Analog film photograph of section 2 related to Direct Flash is Back: How to Nail the
    1. Focus on Texture: Direct flash is unforgiving, but that’s its strength. It aggressively magnifies texture. Shoot subjects wearing sequins, vinyl, metallic finishes, or heavy glitter. The intense light will bounce off these materials, creating an explosive, dynamic effect that elevates the drama and adds an almost cinematic quality to the shot.

    2. Get Close: The closer you are to your subject, the more intense and dramatic the flash effect will be. Due to the physics of light, the inverse square law means the light from your phone’s small flash will fall off rapidly; this means your subject will be brilliantly illuminated while everything even a few feet behind them will dissolve into shadow. This enhances the “spotlight” or “caught in the act” effect.

    3. Shoot in Broad Daylight (The Ultimate Power Move): Don’t reserve the flash just for dark environments. For the most aggressively contrasting and fashion-forward look, use the forced flash during the day. This technique, sometimes called “fill flash” (though here it’s more of an “overpower flash”), creates a surreal, hyper-real look where the sunlight and the flash compete, resulting in ultra-deep black shadows and perfectly lit faces…a signature style of editorial fashion photography from the early 2000s that gives the image a sense of heightened reality.

    4. Black and White Conversion: While shooting in color, consider a high-contrast black and white conversion afterward. The tonal separation created by the direct flash translates beautifully into dramatic monochrome, often mimicking the look of classic tabloid photography that had to be printed quickly and cheaply.The direct flash trend isn’t about taking better photos in the traditional, technically perfect sense; it’s about taking photos with more personality and more story. It’s a statement against the polished, perfect grid, a rebellion in favor of the real, the raw, and the dramatically lit. By manually forcing the flash with ZillaBooth Pro, you’re not just taking a picture…you’re capturing a mood, a moment, and a potent hit of digital nostalgia that feels right on time for today’s visual culture. Step out of the soft light and into the shadows, and let your phone’s flash be the source of your next great, imperfectly perfect shot.

  • The “Kardashian” Glam Booth: How to Fake It

    The “Kardashian” Glam Booth: How to Fake It

    The quest for the perfect photo booth experience has evolved far beyond novelty props and goofy faces. Today’s event hosts, brands, and party planners are chasing a single, dominant aesthetic: the “Glam Booth.” Synonymous with A-list celebrity events, high-fashion editorials, and, yes, the signature black and white, impossibly flawless photos favored by the Kardashian-Jenner family, this look has become the gold standard for premium, high-end photo activations.

    It’s not just a filter; it’s a meticulously crafted lighting setup combined with specific post-processing to create a timeless, studio-quality portrait in a fraction of a second. The good news? You don’t need a multi-million dollar studio budget to achieve it. With the right foundational elements…a white backdrop, specific lighting, and the powerful manual controls available in ZillaBooth…you can replicate this coveted, high-contrast, black-and-white masterpiece for any event. This guide will take you step-by-step from zero to flawless, ensuring your ZillaBooth captures that iconic, magazine-cover quality every time.

    The Anatomy of A-List Flawlessness

    To fake the perfect Glam Booth, you must first understand its core components. The aesthetic is built on three non-negotiable pillars:1. High-Contrast Black and White Conversion: This is what gives the image its timeless, luxurious feel. The absence of color forces the viewer to focus on light, shadow, and texture. Crucially, the conversion isn’t flat; it’s punchy. The blacks are deep and inky, the whites are bright, and the mid-tones are crisp.

    • Shadow-Eliminating Lighting: The goal of this lighting setup is not drama. It is the antithesis of the harsh “paparazzi aesthetic.” Here, we want to virtually eliminate all harsh shadows, especially under the eyes, chin, and nose. The light must be large, soft, and wrap evenly around the subject. This even illumination is the real secret to the “smoothing” effect.
    • Flawless Post-Processing: This is where ZillaBooth comes in. The final layer is a subtle, yet essential, skin-smoothing or ‘beauty’ filter. This step reduces blemishes, softens fine lines, and evens out skin tone, completing the hyper-real, airbrushed look that defines the aesthetic.Part One: The Essential Foundation…The White Backdrop

    A professional studio look demands a professional backdrop. The white backdrop is more than just a canvas; it’s a critical part of the lighting system.

    Why White is Non-Negotiable: * Light Spill and Reflection: A white backdrop acts as a giant, soft reflector. When your main light hits the subject, some light continues onto the white background and then bounces back onto the subject. This fill light is what subtly opens up the shadows on the dark side of the face, contributing significantly to the overall smoothing effect.

    • High-Key Separation: In black and white photography, contrast is everything. A properly lit white background should appear bright, almost pure white, which makes the (darker-toned) subject pop forward. This creates a clean, elegant separation that looks instantly professional.
    • The Seamless Look: For the “Kardashian” look, you must use a seamless white backdrop. This usually means a roll of photography paper or a tension-fabric pillowcase backdrop stretched taut on a frame. Never use sheets, curtains, or wrinkled materials, as the light will pick up every crease, ruining the illusion of perfection.Setup Tip: Place your backdrop at least 3-4 feet behind your subject’s final position. This distance is vital for keeping stray shadows off the background and allowing the backdrop to be lit separately if necessary (though often the light spill from the main subject light is enough).

    Part Two: Mastering the Light…The Smoothing Power

    This is the most critical and most misunderstood step. For this aesthetic, you need one large, soft light source that is placed close to the subject and is aimed straight-on or slightly to one side.

    Guests enjoying a DIY photo booth at an event — section 1

    The Ideal Lighting Choices:1. The Ring Light (The Classic Choice): The most common and effective tool for a Glam Booth. A large (18-inch or greater) LED ring light is placed directly in front of the subject, and the ZillaBooth unit or camera is placed right in the center of the ring.

    Diagram illustrating a photo booth workflow for The
    • Why it works: This setup provides perfectly even, shadowless illumination. The light hits the face from all angles simultaneously, filling in every shadow and wrinkle. It also creates that signature, flattering circular catchlight in the eyes.
    • The Large Softbox or Strip Light (The Professional Choice): For a more sophisticated look, use a large softbox (at least 24×36 inches) or a tall strip light (9×36 inches).
    • Placement: Position the softbox 45 degrees to the left or right of the camera and tilt it down slightly.
    • Why it works: This creates a beautiful, large source of light that ‘wraps’ around the subject’s face. It still eliminates harsh shadows but provides a slightly more dimensional look than a flat ring light, giving a subtle contour that the B&W conversion will emphasize.Pro Tip on Power: The light source must be powerful enough to be the dominant source of illumination in the room. This ensures consistency and prevents environmental light (like yellow overhead lamps) from contaminating the white balance.
    Guests enjoying a DIY photo booth at an event — section 3

    Part Three: ZillaBooth…Your Digital Darkroom

    Once the hardware is set, the magic happens inside ZillaBooth. You need to pre-set the application to capture and process the image in a specific, high-end way. Forget ‘Auto’ settings; we are locking in the perfect exposure and applying the proprietary ‘Glam’ effects.

    Photo booth setup at an event for The
    Placeholder for ZillaBooth app screenshot pending manual capture
    Replace this image: ZillaBooth settings screen for The “Kardashian” Glam Booth: How to Fake It

    Step 1: Lock the Exposure (Manual Control is Key) In ZillaBooth’s settings, locate the manual exposure controls. * Shutter Speed: Set this high (e.g., 1/125th or 1/160th of a second). Since you are using a dedicated light source (ring light or strobe), you need to ensure the fast shutter speed eliminates any motion blur from the subject and only captures the flash’s light. * ISO: Keep this low (e.g., ISO 100 or 200). A low ISO prevents image noise (grain), which is critical for that flawless, smooth finish. * Flash Control: Ensure your light is triggering reliably with ZillaBooth’s external flash sync or, if using a constant LED ring light, simply lock the exposure based on that constant light.Step 2: Activate the “Studio B&W” Filter ZillaBooth offers various B&W conversion options. For the high-contrast Glam look, select the Studio B&W or High-Contrast Monochrome profile. This profile automatically boosts the clarity and contrast, deepening the shadows and brightening the highlights.

    Step 3: The Secret Sauce…The Smoothing Slider The most defining feature of this aesthetic is the flawless skin. In ZillaBooth’s real-time filter panel, locate the ‘Beauty/Smoothing’ slider. * The Right Level: Do not max this out. Excessive smoothing looks artificial and plastic. Set the slider to a moderate level (e.g., 50-60%). This is enough to blur minor imperfections and even out skin tone without removing all natural texture. The combination of the smooth lighting and this subtle software smoothing is what delivers the final, airbrushed result.Step 4: Lock and Save the Template Save this entire configuration…exposure, B&W filter, and smoothing level…as a reusable template (e.g., “Kardashian Glam Template”). This ensures every photo taken during the event is perfectly consistent.

    Step-by-Step Execution Guide for Event Day1. Check the Background: Before the event starts, take a test shot of the empty backdrop. The white should be pure white, with no shadows or gray areas. If the background looks gray, increase the power of your main light or move the subject closer to the light source.

    Diagram illustrating a photo booth workflow for The
    • Test the Posing Spot: Have a friend or model stand exactly where the guests will stand. Pay close attention to the shadows under the chin and under the eyebrows. If there are shadows, the light is too high or not large enough. Adjust the light’s height until the shadows disappear.
    • Review the Output: Take three test photos. Review them on a large screen:
    • Contrast Check: Are the blacks truly black, and the whites truly pure white?
    • Flawlessness Check: Does the smoothing look natural but effective?
    • Consistency Check: Does the subject look consistently lit across all three frames?
    • Coach Your Guests: Unlike a standard photo booth, the Glam Booth look is often enhanced by specific posing. Encourage guests to:
    • Look straight at the camera/light.
    • Use a slight ‘squinch’ (slightly squinting the eyes) for a confident, editorial look.
    • Turn their body 45 degrees but keep their face toward the lens. This instantly makes them look slimmer and more dynamic.Pro Tips for Next-Level Glam * Accessorize with Light: Encourage guests to wear reflective jewelry (sequins, large earrings, metallic fabrics). The powerful, close light source will reflect dramatically off these elements, creating sparkly highlights that look sensational in high-contrast black and white.
    • Matte is Better (For Skin): Advise guests that a touch of setting powder can work wonders. The smoothing effect works best when there is no high-shine oil on the skin, which can sometimes ‘blow out’ or over-brighten under the direct studio light.
    • Use the Vignette Tool: For a final, editorial touch, apply a subtle, dark vignette using ZillaBooth’s effects panel. This subtly darkens the edges of the frame, drawing the viewer’s eye even more powerfully into the perfectly lit center subject and increasing the sense of drama and luxury.The Glam Booth aesthetic is the ultimate expression of modern, high-end event photography. It’s an investment in the guest experience, providing a premium takeaway that feels less like a party snap and more like a commissioned portrait. By combining the physical foundation of the seamless white backdrop and soft, shadow-killing light with the digital precision of ZillaBooth’s manual exposure and smoothing filters, you are no longer ‘faking it.’ You are creating a professional-grade photo booth experience that genuinely lives up to its A-list inspiration. Now go forth, and make every shot flawless.