Tag: DIY Photo Booth

  • Sustainability in Weddings: The “Green” Photo Booth

    Sustainability in Weddings: The “Green” Photo Booth

    Weddings today are experiencing a silent revolution. It’s not about the cut of the dress or the size of the guest list; it’s about conscience. Modern couples, deeply aware of their environmental impact, are demanding that their special day aligns with their values, leading to a massive, irreversible pivot toward eco-friendly and sustainable practices. From locally sourced catering and upcycled décor to carbon offset programs, sustainability has moved from a niche preference to a core pillar of wedding planning. The goal is no longer just a beautiful memory, but a beautiful impact. In this context, every element of the celebration is scrutinized for its environmental footprint…and that includes one of the most beloved party staples: the photo booth. For years, the traditional photo booth, with its endless rolls of glossy paper, was a major, often overlooked source of waste. It’s a relic of an analog age clashing with a nature-forward, digital future. But now, that’s changing, thanks to smart technology designed to bring the fun without the footprint.

    The shift is more than just a passing trend; it’s a demographic imperative. Millennials and Gen Z couples, who collectively drive the majority of current wedding planning, have grown up with climate change as a constant headline. They are skeptical of consumerism and driven by a desire for experiences over material possessions. This translates into wedding choices that prioritize responsible sourcing and minimal waste. They are asking hard questions of their vendors: Where does your food come from? Can these flowers be composted? What happens to the leftover materials? This deep dive into ethics has created a new, defined aesthetic: the “nature-forward” design. This design embraces natural textures, uses living greenery instead of cut flowers where possible, favors raw, unbleached, or recycled materials, and often incorporates digital technology to replace physical paper. This philosophy states that true luxury is clean, conscious, and waste-free. A sustainable wedding isn’t a compromise; it’s a higher standard.

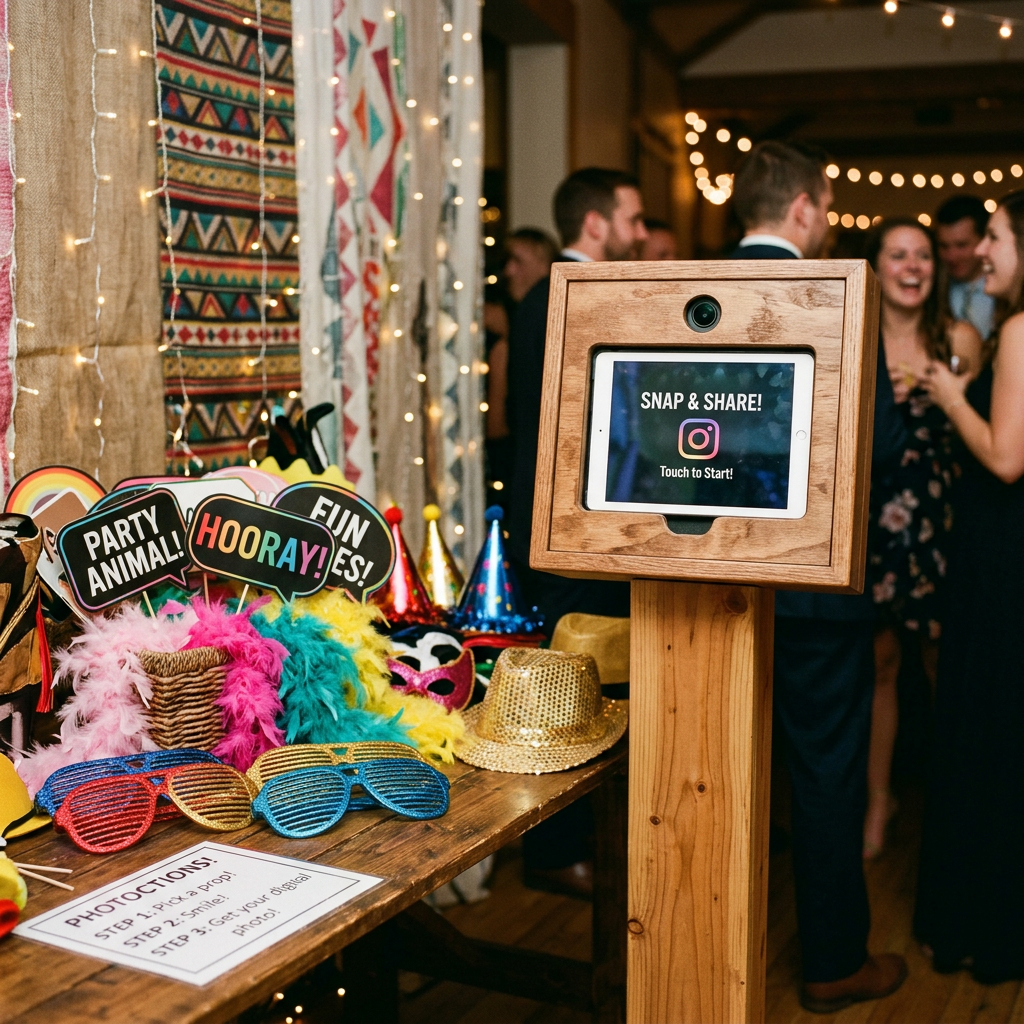
    To understand the solution, we must first understand the scale of the problem posed by traditional photo booths. A typical wedding hosts around 120-150 guests. Over the course of a four-hour reception, that booth is running almost non-stop. If even half of those guests take two sets of photos…one for themselves and one for a guest book…that could easily result in 200-300 glossy, 2×6 inch photo strips printed. Multiplied across the hundreds of thousands of weddings held globally each year, the paper and ink waste is staggering.

    The paper itself is often thermal photo paper or paper coated in chemicals to achieve that high-gloss finish, making it difficult, if not impossible, to recycle through standard municipal recycling streams. It ends up directly in a landfill. The plastic ink cartridges, thermal ribbons, and spare rolls of paper that are tossed at the end of the night further exacerbate the issue. This isn’t just about a few strips of paper; it’s about supporting a linear, wasteful production model…a model that is fundamentally incompatible with the principles of a “green” or “nature-forward” celebration. The irony is stark: a moment of ephemeral fun leaves behind a physical waste product that will last for generations. The industry desperately needed a revolutionary approach.

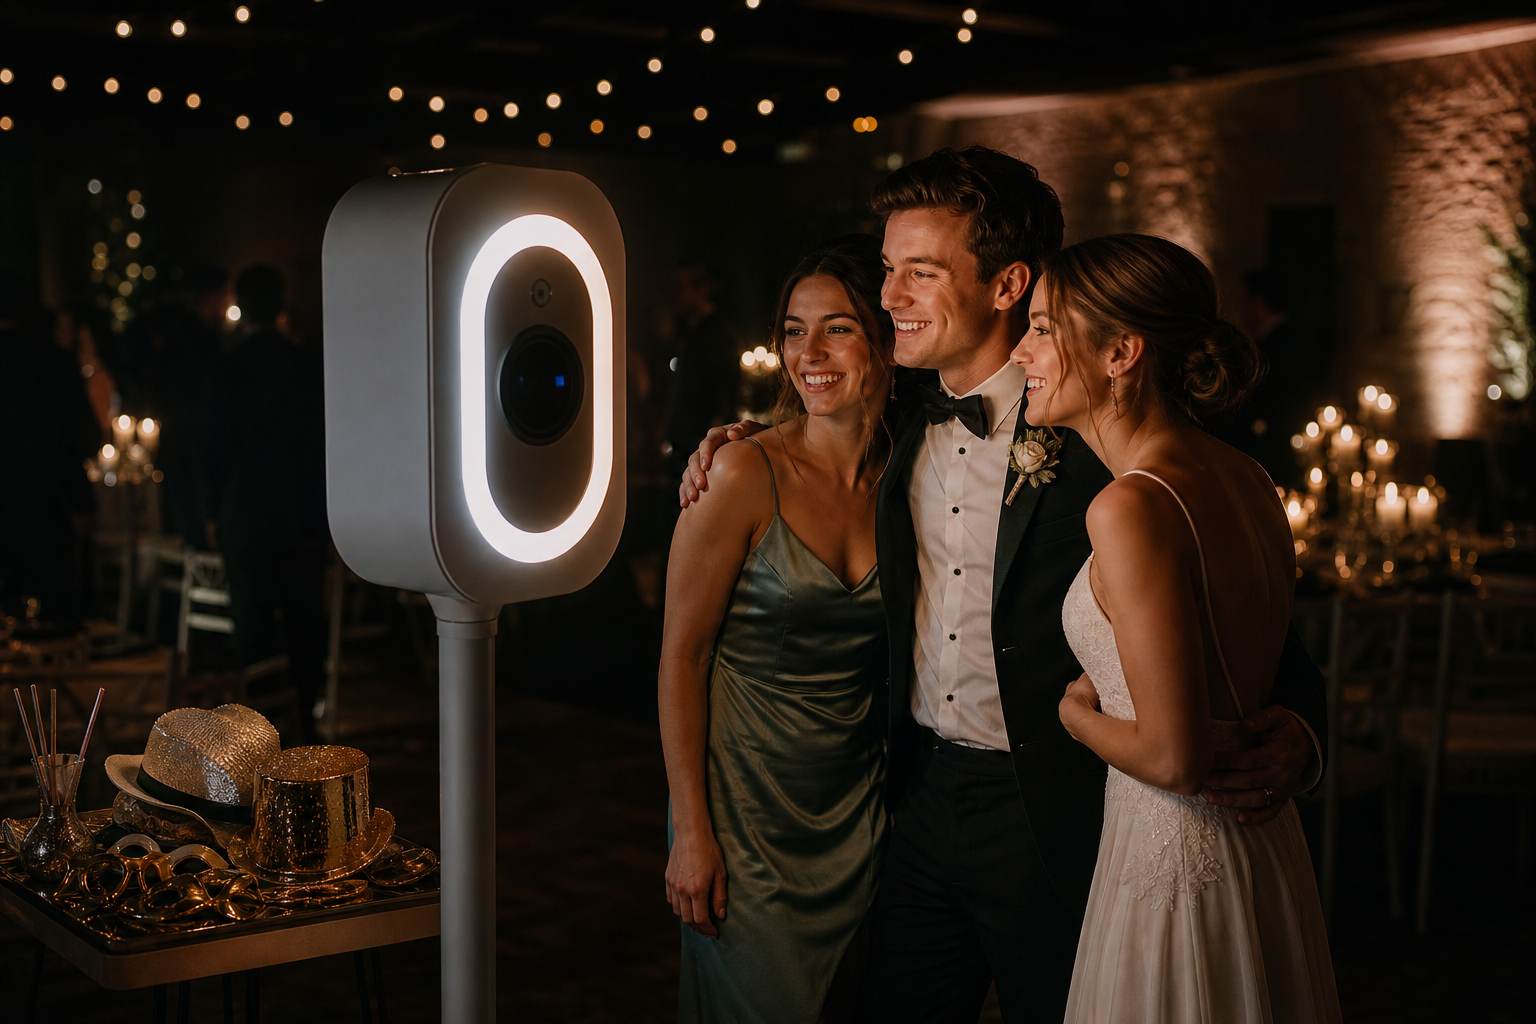
    Enter the next generation of event technology, exemplified by the ZillaBooth. This is where the commitment to sustainability meets cutting-edge convenience. The core innovation of the ZillaBooth model is simple: digital sharing is the default. Instead of a printing press, the booth is a high-resolution capture and distribution system.

    Here is how ZillaBooth entirely removes the paper waste stream from the equation:

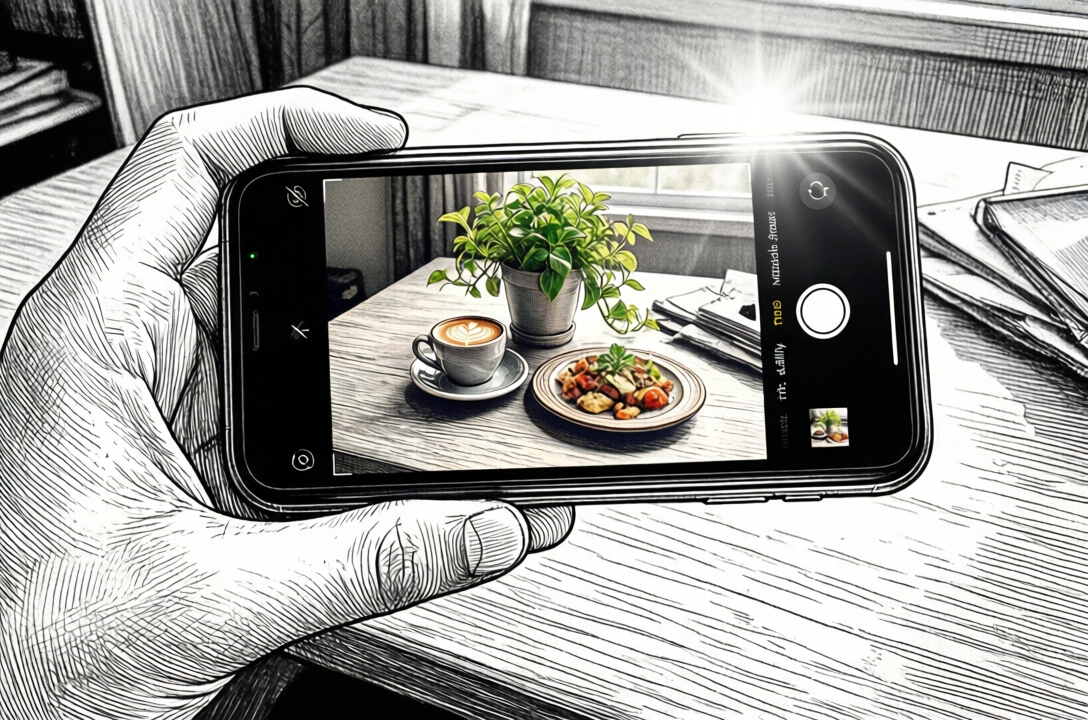
    Instant Digital Delivery: Instead of waiting for a printer, guests receive their photos, GIFs, or boomerangs instantly via text message (SMS), email, or a unique, personal QR code displayed directly on the screen. The entire process takes seconds. This immediate gratification is a massive upgrade over watching a thermal printer slowly process a strip. It respects the guests’ time and their desire for immediate, shareable content.

    No Physical Materials Required: Because the booth is designed for digital capture and delivery, it eliminates the need for paper stock, thermal ribbons, ink cartridges, and the machinery required to store and power the printer. The reduction in physical logistics also lowers the shipping and transport carbon footprint associated with supplying these materials. A paperless booth is a simpler, lighter, and more energy-efficient setup overall.

    Sustainable Guest Book Alternative: The traditional wedding guest book, often filled with glued-in photo strips, is replaced by a digital gallery or a curated online album. This provides the couple with a clean, high-resolution, shareable archive of their wedding memories, rather than a clunky, paper-based artifact that often sits untouched on a shelf. The digital album is easily searchable, shareable with family members across the globe, and permanently archived…a far more robust and enduring record than its physical counterpart.

    This fundamental shift from a ‘print-first’ to a ‘digital-first’ mentality is the most impactful single step a photo booth company can take towards true environmental responsibility. It ensures the memory is preserved, but the Earth is not burdened. The choice is a deliberate, conscious pivot away from the extractive model of event entertainment.

    The choice of a digital photo booth like ZillaBooth extends far beyond the practical benefit of waste reduction; it actively supports and complements the “nature-forward” aesthetic that couples are striving for. The very nature of digital technology is clean, minimalist, and non-intrusive. A “nature-forward” design is characterized by intentionality and a rejection of unnecessary clutter. The ZillaBooth’s sleek, modern design fits seamlessly into this environment. Unlike bulky, printer-housing traditional booths, the ZillaBooth setup can be minimalist…perhaps a simple, attractive pedestal and an elegant backdrop made of recycled wood, living moss, or sustainably sourced linens. The booth itself becomes a subtle, high-tech piece of furniture rather than a disruptive mechanical box.

    Furthermore, the cost savings realized by not having to stock and maintain expensive, single-use photo paper can be redirected into other truly sustainable elements of the wedding. Imagine reallocating that budget toward:

    Local, In-Season Florals: Investing in a local flower farm that uses no pesticides, instead of importing refrigerated, air-freighted flowers. This choice cuts down on transportation emissions and supports local economies, embodying the “nature-forward” ethos.

    Compostable Linens and Serving Ware: Ensuring that any necessary disposable items (like cocktail napkins or tasting plates) are 100% compostable. This reduces the trash volume exponentially, making the event truly low-impact.

    Vendor Choice: Selecting a caterer who is zero-waste or a venue with a robust recycling and composting program. Every dollar spent on the wedding is a vote for the couple’s values.

    By choosing ZillaBooth, the couple is making a high-impact, visible choice that frees up resources to further deepen their commitment to an authentically nature-forward day, where every detail, from the menu to the entertainment, speaks the same language of consciousness and care for the planet. It’s an easy win that has a cascading positive effect on the entire event’s sustainability profile.

    While sustainability is the moral driver, the guest experience is the ultimate measure of any entertainment choice. Switching to a digital-only photo booth not only reduces impact but also significantly upgrades the souvenir guests receive.

    Superior Quality and Versatility: A printed photo strip is low-resolution, chemically-processed, and easily damaged. A ZillaBooth digital file is a high-resolution image, video, or GIF. This is an infinitely more valuable keepsake. Guests can print it later at their leisure, upload it to any social media platform instantly, or use it as a custom phone background. The high-resolution file is perfect for printing on actual archival paper years down the road, if desired, giving the guest control over the final product.

    Instant Gratification and Shareability: In the age of social media, the moment is ephemeral but the desire to share is immediate. Traditional booths force guests to wait for the printer, often leading to queues and missed opportunities. The ZillaBooth delivers the file instantly to their pocket, allowing for immediate sharing on Instagram, TikTok, or a private group chat. The wedding gets an instant, positive digital footprint, organically amplifying the celebration.

    No Clutter: Guests love the idea of a physical keepsake, but how many paper strips truly survive the night, let alone the journey home? Many are lost, crumpled, or discarded almost immediately. By providing a digital file, the couple is giving their guests a meaningful, high-quality, zero-clutter memory. It’s a gift that aligns with a more minimalist lifestyle, perfectly complementing the modern couple’s ethos. This is a crucial element of the ZillaBooth value proposition: better fun, better souvenir, zero guilt.

    For event planners and venues, partnering with a company like ZillaBooth is a simple, high-visibility way to signal a commitment to sustainability without sacrificing luxury or quality. It simplifies logistics and streamlines the vendor approval process, as there are no heavy consumables to manage, store, or dispose of. The operational efficiency is a hidden green bonus…less waste management means less staff time and fewer resources dedicated to cleanup. In a competitive market, being able to offer a truly zero-waste entertainment option is a powerful marketing differentiator. The choice isn’t between fun and earth-friendly; it’s about choosing the most innovative, future-proof option. The traditional photo booth is now a symbol of inefficiency; the digital booth is a symbol of progress and mindful celebration.

    The wedding industry is at an inflection point. Couples are no longer content with simply achieving an aesthetic; they want to embed their values into the very fabric of their day. The shift toward sustainable weddings is not a passing trend but the new normal, driven by a desire for a “nature-forward” world, where beautiful design and ethical choices go hand-in-hand. By choosing a digitally-focused photo booth system like ZillaBooth, modern couples are making a simple yet profound choice: to eliminate hundreds of pieces of single-use, non-recyclable waste while simultaneously enhancing the guest experience with superior, instantly shareable digital memories. It’s a powerful example of how smart, modern technology can solve an old problem, allowing the party to be as green, clean, and joyous as the couple’s vision for their future together. Sustainability doesn’t silence the music; it just finds a better way to capture the dance. It’s time to print memories, not paper.

  • Top 15 DIY Photo Booth Props Under $20

    Top 15 DIY Photo Booth Props Under $20

    The post highlights inexpensive photo booth props that can help guests take playful, shareable photos. It focuses on budget-friendly wearables, signs, and inflatables such as oversized sunglasses, feather boas, letterboards, speech bubbles, and giant frames.

    It also suggests avoiding costly rental equipment by using an iPad with the ZillaBooth app to create an unattended photo booth kiosk.

    Great Photos Start With Great Props

    You don’t need to spend a fortune to get your guests laughing and posing. The secret to a hilarious, highly shareable photo booth is a great prop table. Skip the expensive rental add-ons and hit up Amazon or your local dollar store for these budget-friendly hits.

    Wearables & Accessories

    • Oversized Sunglasses: Heart-shaped, pixelated “deal with it” glasses, or giant stars.
    • Feather Boas: A classic. Buy a multi-color pack so guests can mix and match.
    • Novelty Hats: Think cowboy hats, crowns, captain’s hats, and sequin fedoras.
    • Faux Mustaches & Lips: Get the ones mounted on wooden dowel rods for easy posing.

    Signs & Letterboards

    • Felt Letterboard: Pre-write a funny party slogan or let guests write their own!
    • Dry Erase Speech Bubbles: Let guests write custom messages to the host or couple.
    • Mugshot Boards: Perfect for birthdays and bachelorette parties.

    Inflatables

    • Inflatable Guitars & Microphones: Instant rockstar vibes.
    • Giant Picture Frames: An inflatable gold baroque frame guests can hold up.

    Ready to Set Up Your Booth?

    Now that you have your props, you need the camera! Don’t spend $800 renting a machine. Download ZillaBooth, mount your iPad on a stand, and turn it into a professional, unattended photo booth kiosk in seconds.

    Check out our DIY iPad Photo Booth App

  • 7 Ways to Entertain Your Wedding Guests

    7 Ways to Entertain Your Wedding Guests

    After dinner and dancing, the post suggests low-cost ways to keep wedding guests entertained, including lawn games, table trivia, scavenger hunts, an audio guestbook, late-night snacks, and the shoe game. It also highlights a DIY iPad photo booth as a budget-friendly option.

    The piece says photo booths offer strong value because they can be customized and automated while saving money compared with rentals.

    Keep the Party Moving (Without the Premium Price Tag)

    The food is eaten, the speeches are done, and the dance floor is open. But not everyone loves to dance. To keep the energy high all night, you need alternative entertainment that won’t blow your already-stretched wedding budget.

    Budget-Friendly Wedding Entertainment Ideas

    • Lawn Games: If you have an outdoor space, giant Jenga, cornhole, or croquet are massive crowd-pleasers.
    • A DIY iPad Photo Booth: Skip the $1,000 rental. Set an iPad on a ring light stand, download a photo booth app, and let guests text themselves photos instantly. (Bonus: You get a digital copy of every photo taken!)
    • Table Trivia: Create a custom trivia card about the couple for guests to fill out during dinner.
    • Disposable Camera Scavenger Hunt: Leave a list of “moments to capture” on the tables and let guests play photographer.
    • Audio Guestbook: Buy a vintage phone that records audio messages instead of a traditional pen-and-paper guestbook.
    • Late Night Snack Station: A DIY s’mores bar or a popcorn station keeps guests fueled and entertained.
    • Shoe Game: A quick, 10-minute game where the couple answers funny questions by raising each other’s shoes.

    The Best ROI for Wedding Entertainment

    Nothing gets guests laughing quite like a photo booth. With ZillaBooth, you can add custom wedding overlays, automate the camera, and save hundreds of dollars for your honeymoon.

    Discover the Ultimate DIY Wedding Photo Booth App

  • How to Make a Stunning DIY Photo Booth Backdrop

    How to Make a Stunning DIY Photo Booth Backdrop

    A budget-friendly photo booth backdrop can be built with a simple PVC pipe frame and inexpensive materials. The post suggests using foil fringe curtains, sequin fabric, or balloon garlands to create a themed background.

    It also notes that a phone or iPad on a tripod can be used with the ZillaBooth app to let guests take photos throughout the event.

    Set the Scene on a Budget

    A plain white wall isn’t going to cut it. A dedicated backdrop tells your guests exactly where the photo booth is and sets the visual theme for your event. Building one yourself is surprisingly easy and cheap.

    The Frame: PVC Pipe is Your Best Friend

    You don’t need to buy an expensive photography stand. A quick trip to the hardware store for some 1-inch PVC pipes and connector joints is all you need. You can build a sturdy 7×7 foot frame for under $25. It’s lightweight, easy to assemble on-site, and breaks down for storage.

    3 Cheap & Easy Backdrop Ideas

    1. Foil Fringe Curtains: The ultimate party hack. Tape 3 or 4 metallic fringe curtains to your top pipe. They cost about $10 a pack and look incredibly vibrant on camera.
    2. Sequin Fabric Panels: Buy a cheap sequin tablecloth online and drape it over your frame. It catches the ring light beautifully and gives a premium, Hollywood feel.
    3. Balloon Garlands: Buy a DIY balloon arch kit. Attach it to one corner of your frame and let it cascade down the side for a modern, organic look.

    Capture the Magic

    Once your backdrop is glowing, put it to use! Download ZillaBooth on your iPhone or iPad, set it on a tripod, and let your guests capture memories all night long.

    See how the Birthday Party Photo Booth App works

  • Designing Overlays for Non-Designers

    Designing Overlays for Non-Designers

    You don’t need a degree in graphic design or expensive Adobe software to create a beautiful, branded, professional overlay for a modern photo booth like ZillaBooth. As a non-designer, the task might seem intimidating…after all, you are creating a digital frame that has to perfectly fit a photo that hasn’t even been taken yet. But thanks to powerful, simple online tools, you can easily master this process. The secret weapon for this task is the transparent PNG file, and the best tool for the job is Canva.

    This comprehensive tutorial will walk you through, step-by-step, how to leverage Canva to design a stunning, high-resolution photo booth overlay that is guaranteed to meet ZillaBooth’s technical specifications, ensuring your logo, event name, or custom graphics look flawless on every single print and digital share.

    Understanding the “Overlay” Concept

    First, let’s clarify what an overlay is. In a physical photo booth, the pictures are printed directly onto the paper. In a modern digital photo booth, the process is layered. The camera takes the picture (Layer 1). Then, a digital frame, or overlay, is automatically placed on top of that photo (Layer 2) before it is printed or saved.

    Because the overlay is Layer 2, most of it needs to be completely invisible…or transparent…so the actual photo underneath can show through. Only the parts you want to be visible…like a border, a logo, or text…should be opaque. This invisible background is what makes a transparent PNG so critical. A standard JPEG file can’t do this; it would simply block out the entire picture with a white or colored rectangle.

    ZillaBooth’s Technical Blueprint: The Specs You Must Meet

    To ensure a perfect fit with the ZillaBooth system (or any professional photo booth), you must adhere to two non-negotiable specifications:1. Dimensions (Size): The physical or digital photo size determines your canvas size. For the purpose of this tutorial, we will use the most common rectangular print size: 4×6 inches. To maintain a high-quality, non-pixelated final image, ZillaBooth requires the overlay file to be a precise digital size: 1800 pixels wide by 1200 pixels high. If your ZillaBooth is set to a different ratio (like a square or 5×7), adjust these pixel dimensions proportionally, but the file size must be high-resolution (at least 300 DPI, which these pixel dimensions inherently achieve).
    2. Format (File Type): The file must be a PNG and it must have a transparent background. A JPEG will not work.The Tutorial: Creating Your Overlay in CanvaStep 1: Setting up Your Canvas (The Right Size)

    Open Canva and look for the “Create a design” button, usually in the top right corner. * Select “Custom size” from the dropdown menu.
    * Crucially, switch the unit of measurement from “px” (pixels) if it is set to “in” or “mm.”
    * Enter the required ZillaBooth dimensions: 1800 for the width and 1200 for the height.
    * Click “Create new design.”You now have a perfectly sized, blank canvas. This rectangle represents the final 4×6 photo that will be printed.Step 2: Defining the Safe Zone (Where the Photo Goes)

    Your primary design goal is to create a frame around a large empty space. This empty space is the “Safe Zone”…where the photo will actually appear. You must ensure your design elements do not spill into this zone, or they will cover people’s faces and ruin the picture. * Create a Placeholder: This step is only for design purposes and will be deleted later. Go to “Elements” on the left sidebar and select the “Square” shape.
    * Change the square’s color to a bright, contrasting color like hot pink or neon green. This is your temporary placeholder.
    * Resize the Placeholder: Drag the corners of the square to fill most of the canvas, leaving a clear border around the edge for your design. For a clean, modern look, leave approximately 150-200 pixels of border space on the top, bottom, and sides.
    * This large colored rectangle represents the area where the actual photo will be. The thin, clear border outside of it is the only space you can place your design elements.Step 3: Designing Your Border and Graphics

    Now that you’ve defined the Safe Zone with your placeholder, you can start building the actual overlay elements in the border area. * Add Text: Go to “Text” and add your event name, date, or a hashtag. Place this text neatly into the border area…for example, centered at the very top or in a corner. Ensure the text size is legible but doesn’t feel cramped.
    * Insert the Logo: Click “Uploads” and upload your company or event logo. Critical Tip: If you have a version of your logo that is already a transparent PNG, use that. If not, use Canva’s “Background Remover” tool on your uploaded logo image (requires Canva Pro). Place the logo strategically, such as in the bottom-right corner or centered below the photo area.
    * Add Decorative Elements: Use “Elements” to add simple decorative touches like thin lines, leaves, confetti, or a solid color block for a clean background. Ensure all of these elements are fully contained within the border space and do not overlap your bright placeholder square.
    * The Crucial Deletion: Once your design is finished, click on the brightly colored Safe Zone placeholder square and press the delete key. Your canvas should now look like your design elements floating on a blank white background. This blank white area is what will become transparent in the next step.Step 4: The Transparency Trick (Exporting as PNG)

    This is the most crucial step and the one that separates a successful overlay from a failed one. * Click the “Share” button in the top right corner of Canva.
    * Click “Download.”
    * In the file type dropdown menu, select “PNG.”
    * Directly beneath the file type selector, there is a very important checkbox labeled “Transparent background.” YOU MUST CHECK THIS BOX. Note: This feature is exclusive to Canva Pro (the paid subscription). If you do not have Canva Pro, you will need to find another tool or start a free trial. This is non-negotiable for a professional overlay.
    * Ensure the size is set to the default (1800 x 1200 px).
    * Click the “Download” button.The file you receive will be a high-resolution PNG where the area that was blank white in your Canva design is now completely transparent, allowing the photo booth picture to show through perfectly.

    Design Masterclass: Logo Placement and Framing Tips

    Creating a successful overlay goes beyond just the technical specifications…it’s about optimizing the design for the photo booth experience itself. As a non-designer, keep these four best practices in mind to create a polished, effective frame.1. Prioritize Face and Body Space (The “No-Go” Zone)

    The biggest mistake is placing design elements in the main picture area. Your job is to frame the experience, not obscure it. * Avoid the Center: Never put a large logo or graphic in the middle-bottom or middle-side of the frame. This is precisely where people’s torsos, shoulders, or hands will be. A logo placed there will look sloppy and block key parts of the photo.
    * The Corners are Your Friends: The top-left, top-right, bottom-left, and bottom-right corners are the safest real estate. Place the date and hashtag at the top, and your logo small and unobtrusive in the bottom corner. A simple, thin border around the entire Safe Zone is often the most elegant solution.
    * Test on a Mockup: Before finalizing, temporarily drag in a dummy photo of people (or a stock photo) into your Canva design, place it on the bottom layer, and ensure none of your design elements are covering faces, hands, or important action.2. The Power of Simplicity and Contrast

    Photo booth photos are often fast and busy. Your design should be simple and high-impact. * One or Two Key Elements: Don’t crowd the border. Focus on a single, clear logo and one line of text (like the event name). Visual clutter distracts from the people in the picture.
    * High Contrast Colors: Ensure your design colors stand out against the white/black of the typical photo booth background. If your event has dark lighting, use light colors like white or gold. If the event is in a bright space, dark, rich colors will pop. Do not use pastels or shades that are too close to skin tones.3. Strategic Logo Sizing and Consistency

    Your logo needs to be visible without dominating the frame. * Size it for Readability: A logo that is too small becomes blurry or unreadable when printed. Aim for a size where the logo is clearly identifiable, but never larger than about 1/8th of the total border space.
    * Brand Color Matching (Hex Codes): If you are working for a brand, you should know their exact color codes (Hex codes, e.g., #FF5733). In Canva, use the color picker to input these codes precisely. This ensures your overlay matches the client’s brand guidelines perfectly, adding a professional touch that even a junior writer can master.4. The Clean Frame vs. The Full Overlay

    Decide on your framing style upfront: * The Clean Frame: This is a simple, rectangular border that runs along the very edge of the Safe Zone. It’s safe, professional, and ensures maximum photo space. All design elements (logos, text) are placed on top of this border.
    * The Full Overlay: This style covers the entire background of the canvas with a solid color or pattern, except for the Safe Zone. This is useful if you want to create a full-bleed colored background for the final print (e.g., a solid gold frame). If you choose this, make sure the solid color is part of the PNG design, and the Safe Zone remains completely transparent.By following these technical steps in Canva…setting the exact ZillaBooth pixel dimensions, ensuring your logo is an uploaded transparent element, deleting the Safe Zone placeholder, and most importantly, checking the “Transparent background” box on export…you will have successfully created a professional, high-quality, and perfectly fitted photo booth overlay. You have bypassed the need for complex design software and achieved a flawless, branded result. Upload the final PNG file to your ZillaBooth interface, and watch your design elevate the entire event experience.

  • Lighting 101: How to Light Your DIY Booth for “Low Light” Venues

    Lighting 101: How to Light Your DIY Booth for “Low Light” Venues

    The days of harshly lit, sterile-looking event spaces are over. A major, undeniable shift has taken place in the event industry, particularly in weddings and milestone celebrations: the rise of the atmospheric, low-light ceremony and reception. This aesthetic, characterized by hundreds of flickering candles, string lights, dramatic uplighting, and strategically placed spot lamps, creates an air of romance, intimacy, and sophisticated moodiness that guests adore. It’s a photographer’s dream for ambiance, but it can quickly become a photo booth operator’s nightmare.

    If you’re running a DIY photo booth like ZillaBooth…a system celebrated for its portability and professional-grade results…you know that great photos rely on one thing above all else: great lighting. When you introduce a powerful, non-diffused light source like a standard camera flash into a carefully curated low-light environment, you risk blowing out the atmosphere. However, if you rely on the venue’s dim lighting, you’ll end up with dark, grainy, blurry, and frankly unusable photos.

    The good news? You don’t have to choose between a moody ambiance and delivering stellar photo booth strips. By understanding the fundamentals of lighting control and leveraging specific tools with your ZillaBooth, you can conquer any dark reception hall and turn the low-light setting into an artistic advantage. We’re going to break down two essential, yet distinct, strategies for achieving flawless results: the consistent, soft glow of the ring light and the high-contrast drama of the Pro “Flash Control.”

    Strategy 1: The Ring Light … Simple, Soft, and Effective

    For operators seeking a classic, flattering, and instantly recognizable photo booth look, pairing your ZillaBooth with a dedicated, high-quality ring light is the best strategy. The ring light offers a consistent, diffuse, and shadow-minimizing light source that is perfect for low-light conditions because it adds light without destroying the existing mood.

    Selecting the Right Ring Light
    Not all ring lights are created equal. When operating in a low-light venue, you need control and power. Look for a model that meets these specifications:1. Large Diameter (18-20 inches): A larger light source is a softer light source. A wider diameter ensures the light wraps around the subject’s face, reducing harsh shadows and creating the signature, attractive circular catchlights in the eyes.
    2. Adjustable Color Temperature (Bi-Color): This is non-negotiable for working in moody venues. Low-light spaces often use warm (amber/yellow) tungsten or LED lighting (typically 2700K-3500K). To prevent your photo booth subjects from looking blue or cold, you need to match the ambient warmth. A bi-color ring light allows you to dial in the color temperature from cool white (daylight, ~5500K) all the way down to a warm tungsten glow (~3200K). Match the light to the venue’s color scheme for a cohesive, professional look.
    3. Variable Dimming: Being able to adjust the brightness from 10% to 100% is crucial. In a very dark room, you may need it at 80% or higher. If the venue has some existing light, you might only need 30% to serve as a flattering fill light.Setting Up the Ring Light with ZillaBooth
    Integrating the ring light with the ZillaBooth is straightforward and results in a beautiful, consistent product. * Mounting: If your ZillaBooth stand supports it, mount the ring light directly around the camera lens. This ensures the light is perfectly centered for that iconic, shadowless look. If it requires a separate stand, position the ring light as close as possible to the lens axis. The closer the light is to the camera, the softer the final image will appear.
    * Dialing In the Power: The key to using a ring light in a low-light venue is consistency. Once you’ve set the color temperature to match the venue’s warmth, take a few test shots. Increase the power until the subject’s face is brightly and evenly illuminated, but stop before the light begins to “spill” too heavily onto the background, which would destroy the dark, moody ambiance. The goal is to isolate the subject.Pro Tip: The Power of Proximity
    Remember the inverse square law of light: light falls off rapidly as the distance from the source increases. By positioning the ZillaBooth and ring light system a comfortable distance from the background (say, 5-8 feet), the ring light will brilliantly illuminate the subjects while the background remains in the relative darkness, enhancing the cozy, dramatic feel of the low-light venue. The soft, even light of the ring light is the best way to guarantee flattering, high-quality images while respecting the intentional darkness of the room.

    Strategy 2: The Pro “Flash Control” … High-Contrast Drama

    While the ring light offers soft consistency, there are times when you need raw, uncompromising power, especially if you want to capture the dynamic energy of a packed, dark dance floor or if you encounter a space that is so dark that a ring light alone introduces too much noise or motion blur. This is where the advanced functionality of the ZillaBooth Pro (or a similar manual control app) and its “Flash Control” feature becomes indispensable.

    Understanding the Forced Flash Aesthetic
    In auto-mode, a standard camera flash tries to balance the flash with the dim ambient light, which often results in a slow shutter speed. Slow shutter speeds in a photo booth environment guarantee motion blur…ruined photos. The Pro “Flash Control” allows you to manually force the flash to fire at full power, regardless of the ambient lighting. This accomplishes two critical things:1. It freezers motion: A powerful, brief flash allows the camera to use a fast shutter speed (e.g., 1/160th of a second), which completely eliminates motion blur from dancing or moving guests. The subject is frozen perfectly in time.
    2. It creates high contrast: By forcing a fast, powerful, and undiffused flash, you create a dramatic, high-contrast look often called the “paparazzi aesthetic” or “editorial flash.” The subject is intensely illuminated, while the rest of the dark room falls away into deep, black shadows. This aesthetic perfectly complements the drama of a low-light venue.How to Leverage ZillaBooth Pro’s Flash Control
    The core principle is to take the flash function out of automatic control. * Access the Pro Settings: Navigate to the advanced settings menu in your ZillaBooth Pro application. Locate the flash icon or “Flash Control” setting.
    * Set to Manual “Force On”: Change the setting from “Auto” to “Manual Force On” or simply “On.” This ensures the flash fires with every single shot, giving you complete control over the exposure.
    * Adjusting Shutter and ISO: Since the flash is now your primary light source, you can manually set the camera’s ISO (sensitivity) to a low number (e.g., ISO 100 or 200) to virtually eliminate digital noise (graininess). You can also set a fast, safe shutter speed (e.g., 1/125th) to guarantee sharpness. The flash exposure controls the subject, and the fast shutter speed controls the blur.Pro Tip: The Drag the Shutter Technique (Advanced)
    If you want to capture some of the beautiful ambient background light (like those string lights or candles) while still freezing the subject, use a technique called “dragging the shutter.”1. Keep the flash “Force On.”
    2. Slow the shutter speed slightly (e.g., from 1/125th down to 1/30th or even 1/15th of a second).
    3. The flash will still fire, freezing the subject perfectly, while the slower shutter speed allows the camera to record a bit of the colorful, streaky background ambient light. The result is a dynamic, high-energy photo…a sharp subject with a moody, artistic, slightly blurred backdrop. This is a highly professional technique that works wonders in dark spaces.Bonus Tips for Flawless Dark Venue Booths

    Mastering the light is only part of the equation; placement and preparation are equally important when dealing with the challenge of low-light venues. * Background Management: In a dark venue, the background can be a messy distraction. If you’re not using a dedicated backdrop, place the ZillaBooth against a dark, featureless wall or an area where the lighting is particularly sparse. This lets your lighting strategy (whether ring light or forced flash) isolate the subjects and allow the rest of the room to fade away, enhancing the portrait-like quality of the photos.
    * Avoid Competing Light Sources: Position the photo booth away from any venue spotlights, aggressively bright exit signs, or large windows. These competing light sources can confuse the camera and create wildly inconsistent exposures in your shots. You want your controlled light source to be the only significant light source on your subject.
    * Use the Prop Tray Strategically: Glitter, sequins, and reflective surfaces are your friends when working with direct light. Encourage the use of shiny props. The ring light or the forced flash will bounce aggressively off these materials, creating an explosive, dynamic effect that adds visual energy to the photo, which is especially important in an otherwise dark setting.
    * Lens Maintenance: Dust or smudges on the camera lens are invisible in bright light but become glaringly obvious when a powerful flash or ring light hits the glass. Before the event and periodically throughout, give your lens a quick wipe with a microfiber cloth. A clean lens ensures maximum light transmission and crystal-clear results.The modern low-light event is an aesthetic challenge, but it’s also a powerful opportunity. By implementing the soft, consistent light of a high-quality ring light or the dramatic, sharp contrast of the Pro “Flash Control” technique, you transform the ZillaBooth from a simple camera system into a sophisticated lighting tool. You no longer have to compromise the beauty of the venue for the quality of the photo…you can leverage the darkness to make your guests truly stand out. Go forth and master the light, even when there is almost none.

  • The Return of the House Party: Elevated At-Home Events

    The Return of the House Party: Elevated At-Home Events

    In the shifting landscape of modern social life, a quiet revolution is taking place right in our living rooms. Faced with soaring costs of living…from astronomical prices for a single cocktail at a downtown bar to venue rental fees that could fund a small vacation…many of us have pressed pause on grand, outside-the-home celebrations. But while our wallets may be tightening, our desire for community, connection, and celebration remains as strong as ever.

    This is the year the house party makes its triumphant return, but not in the form of lukewarm beer and faded college posters. The new house party is a highly intentional, elevated event. It’s the “home gala,” a sophisticated, high-value gathering that offers the glamour and memorable moments of a five-star venue without the crippling price tag.

    The secret to this transformation lies in strategic planning, a focused approach to ambiance, and leveraging high-impact, easy-to-deploy technology. We’re not just having people over; we are producing an experience.

    The Foundation: Why At-Home is the New VIP

    The economic argument for hosting at home is clear: you control the bar tab, the catering costs, and the music licenses (or lack thereof). However, the emotional case is even stronger. A house party, when executed with care, offers a level of intimacy and authenticity that no rented banquet hall can match. Your personal space, thoughtfully decorated, already tells a story. This inherent warmth is the perfect foundation for a truly memorable gala, provided you address the three primary concerns that plague the typical house party: low-effort ambiance, logistical chaos, and lack of a central, high-quality attraction.

    Pillar 1: Staging the Gala – Transforming Your Space

    A gala is defined by its atmosphere. The moment a guest walks through the door, they must feel transported. This requires you to view your living room not as a default space, but as a blank canvas for set design.

    Lighting is your most powerful, and often cheapest, tool. Ditch the harsh overhead lights immediately. Invest in smart bulbs or inexpensive LED strips that can be set to a warm, consistent color palette…deep indigo, rich magenta, or classic champagne gold. Place battery-operated pillar candles (flameless is safest) everywhere: on bookshelves, window sills, and coffee tables. Use uplighting…simple floor lamps aimed at the ceiling…to wash the room in soft light, creating height and depth that mimics a professional event space.

    Sound is the invisible architecture of your party. Curate a playlist with the meticulous care of a museum curator. Start with a sophisticated, conversational tempo (think jazz or deep house) and only transition to dance music once the energy demands it. If you lack a powerful speaker system, consider borrowing one or renting a small PA for the night; crystal-clear audio is non-negotiable for an elevated feel.

    Theme and Dress Code are the keys to commitment. A gala isn’t just a fancy dinner; it’s an opportunity for guests to participate in the elevation. Explicitly require a formal or semi-formal dress code on your invitation: “Black Tie Optional,” “Cocktail Attire,” or “Opulent Metallics.” When guests dress the part, they instantly behave the part, transforming the atmosphere from casual hang-out to special occasion.

    Pillar 2: Culinary and Cocktails – Affordable Luxury

    A common trap in house parties is either overspending on full catering or defaulting to uninspired chips and dips. The home gala excels with strategic, self-service luxury.

    The Signature Cocktail: Instead of stocking a full bar, which is expensive and confusing for guests, create two or three elevated signature cocktails (one spirit-based, one wine-based, and a sophisticated non-alcoholic option). Pre-batch the mix in large dispensers or elegant glass bottles. Set up a dedicated, visually stunning bar area with beautiful glassware (thrifting for unique coupes and highball glasses adds charm and reduces cost) and high-quality garnishes: dehydrated citrus slices, fresh herbs, and artisanal ice cubes. This focuses your budget on quality ingredients for a limited selection, maximizing the perceived luxury.

    Elevated Finger Foods: Avoid anything that requires a fork and plate. Focus on small, visually appealing canapés that guests can enjoy standing up. Charcuterie boards are timeless, but elevate them with unusual components: honeycomb, fig jam, spiced nuts, and unique cheeses. Offer mini quiches, chilled shrimp skewers, or a sophisticated dessert bar featuring mini chocolate tarts and macaron towers. Preparation should be done in advance so the host isn’t confined to the kitchen. The rule is simple: if it looks professionally catered but you made it yourself, you win.

    Pillar 3: The Game-Changer – Introducing ZillaBooth Party

    The biggest missing piece in the traditional house party is the ‘attraction.’ Formal events have stages, performers, or massive dance floors. The home gala needs a central, high-impact feature that encourages interaction, creates memorable content, and provides a professional keepsake. This is where ZillaBooth Party transforms your living room into an event venue.

    What is ZillaBooth Party?
    ZillaBooth Party is a sleek, professional-grade photo and video booth system designed for easy, at-home deployment. Unlike clunky, rented kiosks, the ZillaBooth system utilizes a small footprint and leverages a high-quality camera and professional-level ring lighting to instantly create studio-quality content. It’s an interactive memory-making machine that provides a high-end experience guests associate with galas and weddings.

    How It Elevates the Gala Experience:1. Professional-Grade Mementos: The Achilles’ heel of a normal house party is the reliance on phone-camera snapshots, which are often blurry, poorly lit, and inconsistent. ZillaBooth Party guarantees beautiful, crisp, and perfectly lit photos and slow-motion video clips (boomerangs or 360-degree shots). Every guest walks away with a digital souvenir that looks like it was taken by a professional event photographer.

    1. Instant Branding and Cohesion: To feel like a gala, the event needs polish. ZillaBooth Party allows you to customize digital overlays and frames with a sophisticated design matching your invitation or theme. A simple, elegant frame featuring “The [Your Last Name] Gala 2026” instantly turns a fun photo into a cohesive, branded event artifact. This level of detail elevates the perceived cost and professionalism of the evening.

    2. The Designated Attraction: By placing the ZillaBooth in a prominent, beautifully decorated corner of the room (perhaps in front of a simple sequined backdrop or a large floral arrangement), you create a destination. It’s a natural gathering point that prompts interaction, encourages guests to show off their formal attire, and breaks the ice for those who might be shy about dancing or mingling. It provides a structured activity for everyone.

    3. Seamless Digital Delivery: Guests can instantly text or email themselves their photos and videos directly from the ZillaBooth interface. The host gets a complete digital album of the entire night, creating a high-quality, professional photo album without having to ask a single guest to send them pictures. This is the ultimate low-effort, high-impact memory solution. The combination of cost-savings on venue and catering, invested into one central entertainment attraction, provides a far superior return on experience.Pillar 4: Mastering the Flow and Minimizing Host Fatigue

    The final component of the successful home gala is managing logistics so the host can actually enjoy their own party. A relaxed host is essential for a relaxed, fun environment.

    Create Zones: Don’t let the entire party congregate in one place. Define zones with clear purpose. – The Reception Zone: Entryway/Hallway for coat check (even a designated bed).
    – The Core Zone: Living Room for mingling and the ZillaBooth Party.
    – The Refreshment Zone: Kitchen/Dining Room for the self-service bar and food.Automate the Little Things: Use automated music controls. Set up a simple trash and recycling system that is clearly labeled and accessible. Stock the bathrooms well in advance. The less you have to think about during the party, the more you can embody the role of the gracious host, which is the ultimate mark of an elevated event.

    Follow-Up: The professional touch of a gala is the post-event communication. Use the beautiful content generated by the ZillaBooth Party…the highlight reel and best photos…to send a personalized, “thank you for joining our inaugural gala” email the next day. It extends the memory and validates the effort guests put into their attire and attendance.

    The return of the house party is a testament to resilience, creativity, and the enduring need for quality social connection. In a climate where every expense is scrutinized, hosting a “home gala” is the savvy choice. It’s not a compromise; it’s an upgrade. By combining thoughtful ambiance, strategic catering, and the high-impact entertainment of the ZillaBooth Party, you move beyond mere casual gathering and into the realm of truly unforgettable, elevated at-home events. You save money, you deepen connections, and you prove that the most exclusive venue in town is the one you already own.

  • $36,000 Average Spend? How to Slash Your Wedding Budget with DIY Tech

    $36,000 Average Spend? How to Slash Your Wedding Budget with DIY Tech

    The number is staggering, isn’t it? Thirty-six thousand dollars. That’s the average price tag for a wedding in the United States today, and for many couples, that figure is less a dream budget and more a nightmare down payment on a second mortgage. It represents a level of financial commitment that can feel overwhelming, pushing couples to choose between the wedding they’ve always envisioned and the financial security they need for their future.

    But what if the choice didn’t have to be so absolute? What if you could host a high-impact, memory-filled celebration that feels like a $36,000 event, but costs a fraction of the price?

    The core challenge with the average wedding budget is that it’s bloated by what we can call the “Vendor Premium”…the cost associated with outsourcing every single detail to a professional who charges not just for their time, but for the inherent hassle, insurance, transport, and the sheer privilege of being a wedding supplier. These costs accumulate in every category, but they hit hardest in areas that are easily replaceable by modern, DIY-friendly technology.

    A modern couple understands that they don’t have to follow the old playbook. They recognize that their generation is the most digitally savvy, creative, and resource-aware generation to ever plan a wedding. They are masters of the side-hustle, the online tutorial, and the app-based solution. The secret to slashing that massive average budget isn’t about cutting corners; it’s about making high-impact swaps. It’s about identifying services that are overpriced because they carry the “wedding tax,” and replacing them with equally or more effective technological alternatives.

    Think about what truly makes a wedding memorable. It’s the atmosphere, the quality time with loved ones, the personal touches, and the candid, unscripted moments of joy. It is rarely the specific model of the chair, the weight of the paper stock on the menu card, or the brand of the photo booth machine parked in the corner. If you can use smart, affordable technology to achieve the same emotional result, you have not cut the experience; you have simply slashed the overhead.The Overlooked Budget Killer: Experience Rentals

    Let’s dissect where this budget bloat often occurs. Catering, venue, and photography are usually the big three, and while those offer some savings opportunities, the biggest, fastest, and most painless savings come from the experiential add-ons. These are the items that deliver huge fun and value, but that vendors charge exorbitant fees for, simply because they are part of a curated ‘package.’

    Take, for instance, the classic photo booth. A photo booth rental is a beloved wedding staple. It gives guests something fun to do, it encourages candid silliness, and it generates physical or digital souvenirs. For a standard four-hour rental on a Saturday night, couples routinely pay anywhere from $800 to $1,500. This fee covers the machine’s transport, the attendant’s hourly wage, printing paper, and the company’s profit margin. For a mere four hours of fun, you are committing a four-figure sum.

    This is a classic example of a high-impact item with an artificially inflated cost. You are not paying $1,000+ for the technology; you are paying $1,000+ for the vendor’s logistics and time. The truth is, the technology required to capture a fun, instant-sharing GIF or photo strip is now sitting in the hands of almost every guest at your wedding, and certainly, it’s readily available through easy-to-use, powerful software. This is where modern couples must become ruthless budget surgeons, replacing the outdated rental model with the superior DIY tech solution.Introducing Your $1,000-Slasher: ZillaBooth

    The most powerful way to slash the $36,000 budget is to replace a high-cost, high-impact item with a low-cost, equally high-impact DIY tool. Meet ZillaBooth, the perfect example of how technology can deliver the full experience without the crippling price tag.

    ZillaBooth is not a physical rental machine; it’s an application that turns a standard tablet or an iPad into a professional-grade photo booth. The cost is negligible…you can use the free version for a basic setup, or upgrade to the premium version for advanced features, all for a staggering $9.99.

    Now, let’s look at the math. By choosing ZillaBooth instead of the average $1,000+ rental booth, you have instantly freed up nearly a thousand dollars. This is not some small, insignificant saving; this is a significant, four-figure reallocation of funds.

    The key to this swap is realizing that you are not sacrificing quality or experience. In many ways, the DIY tech option is actually superior:1. Unlimited Time and Use: Traditional booths are rented for a fixed period (e.g., 7 PM to 11 PM). With ZillaBooth on a simple stand, the fun never has to stop. It can run from the cocktail hour straight through to the last dance. You are paying a one-time, single-digit price for infinite usage hours.
    2. Zero Attendant Hassle: You eliminate the need for a vendor attendant. Setup is as simple as launching an app on a tablet. Your maid of honor or a tech-savvy friend can launch it once, and it runs itself for the rest of the night, saving you hundreds in labor costs alone.
    3. Instant Digital Access & Full Control: With a legacy vendor, you usually wait days or weeks for the digital gallery. With a DIY app, the photos are captured instantly, giving you full ownership and control over every image and GIF created. You decide if, when, and how they are shared.
    4. Customization and Personalization: The $1,000+ rental booth will offer you a few templates. A DIY app often allows for more bespoke design options, letting you upload custom overlays, logos, and digital props that perfectly match your wedding theme, all without extra fees.This single swap…from a $1,000+ rental to a $9.99 DIY tech solution…is the prototype for smart, budget-slashing wedding planning. It proves that a great wedding is built on great moments, not on exorbitant vendor bills. The value of a candid, goofy photo strip is the same whether it was created by a machine costing $10,000 or an app costing $10.Reallocating the Savings: Investing in the Experience

    The real beauty of this method is the ability to reallocate the funds to areas that will truly enhance the wedding or, even better, your future as a couple.

    That saved $990 can be the difference between: * Upgraded Catering: Taking the money and shifting it to your food and beverage budget can allow you to upgrade from a basic chicken or fish entrée to a premium cut, or add an extra signature cocktail that guests will genuinely remember. Food is often the most talked-about part of a wedding, and this saving directly elevates that core experience.
    * The Honeymoon Fund: A $1,000 saving can cover one of the flight tickets to your dream honeymoon destination, or pay for three to four nights of luxury accommodations. Instead of paying for a vendor to sit next to a machine for four hours, you are paying for an experience that lasts a lifetime.
    * Financial Future: Perhaps the smartest move is reallocating the funds entirely out of the wedding. That $1,000 can go straight into a down payment savings account, a retirement fund, or pay off a chunk of existing debt. When you position the low-cost ZillaBooth as a substitute for a high-cost luxury service, you are essentially diverting a significant portion of your wedding budget into your marriage’s financial foundation. You are prioritizing life over event.Beyond the Booth: A Tech-First Wedding Mindset

    Once you embrace the philosophy of high-impact DIY tech, you’ll find opportunities everywhere to cut costs and boost personal control. The photo booth is just the beginning.1. Digital Invitations and RSVPs: The average cost of paper stationery (save-the-dates, invitations, RSVP cards, postage) can easily exceed $1,500 for a moderate guest list. Utilizing elegant digital wedding websites and online RSVP management tools can eliminate most of this cost entirely, saving another four figures while improving organization and tracking.
    2. The DIY DJ Solution: Hiring a professional DJ can cost upwards of $2,000. For a couple who is extremely organized and has a firm grasp of their desired musical flow, using a high-quality streaming service or an AI-powered music app can replace the DJ for a fraction of the cost. A dedicated sound system rental, paired with a meticulously curated playlist, delivers the same dance floor impact.
    3. Coordination Software: Instead of paying a full-service planner an exorbitant fee, couples can manage their own logistics using comprehensive, low-cost or free planning software, focusing on hiring a day-of coordinator only to manage final execution, saving thousands.The average $36,000 wedding budget is a historical anchor tied to outdated industry practices. Today’s couples don’t have to accept it. By adopting a mindset that prioritizes smart technology and DIY execution for high-impact services, they can host a spectacular, meaningful wedding while ensuring that their financial future as a couple is not compromised. The goal is to move money away from vendor overhead and towards life experiences…a concept brilliantly exemplified by the choice between a $1,000+ rental booth and a $9.99 app. Your wedding day is an investment, and the smart planner chooses to invest in memories and the future, not just in rentals. Start with the photo booth, and watch that average spend figure plummet.

  • The Micro-Wedding Survival Guide: Big Fun for Small Lists

    The Micro-Wedding Survival Guide: Big Fun for Small Lists

    The modern micro-wedding is an exercise in intentionality. It is not merely a smaller version of a large-scale event, nor is it a simple cost-cutting measure. Instead, it represents a profound shift in focus, prioritizing quality over quantity, intimacy over spectacle, and deeply personalized experiences over generic extravagance. When a couple consciously decides to pare their guest list down to 50, 30, or even 10, they are making a powerful statement: every element, from the menu to the music, must feel curated, personal, and reflective of the genuine connection they share with each person in attendance.

    This focus on intimacy, however, creates a unique logistical challenge, particularly when it comes to capturing the memories. A micro-wedding feels less like a grand event and more like the most beautifully planned, elegant family dinner of a lifetime. The atmosphere is warm, conversational, and deeply personal. Into this setting, how do you introduce the necessary elements of traditional celebration…especially photography…without shattering the intimate bubble the couple has so carefully created?

    This is where the conventional, full-service photo booth, complete with a dedicated attendant, falters. While these booths are excellent for large parties, the presence of a contracted stranger…the booth operator…can feel intrusive and out of place among a tight-knit group of immediate family and closest friends. The high-end, customizable, self-run photo booth emerges as the perfect, elegant solution, providing a fun, high-quality, and deeply personalized memory-capture experience that enhances, rather than disrupts, the wedding’s unique atmosphere.

    The Micro-Wedding Photography Conundrum

    To appreciate the value of a self-run photo booth, one must first understand the paradox of micro-wedding photography. Couples are still investing heavily in a primary wedding photographer. This professional is vital for capturing the ceremony, the portraits, and the major moments of the day. But during the reception…when the structured events give way to organic conversation, dancing, and heartfelt toasts…even the most discreet photographer will naturally pull back. Their lens, though essential, can feel like a continuous, formal reminder that the event is being documented.

    When guests are few, the photographer’s presence is magnified. There is no crowd to melt into. In this scenario, asking the main photographer to double as a fun, candid photo booth operator is neither practical nor fair, as it distracts them from their primary documentary role. The challenge is clear: how to provide a designated, fun, and high-quality space for playful, uninhibited photographs that guests can control, without introducing yet another service vendor…a stranger…into the already intimate circle.

    The Self-Run Photo Booth: Quality Meets Comfort

    The modern, self-run photo booth is not the cheap, flimsy contraption of a decade ago. It is a sleek, professional-grade kiosk, often housing a high-resolution DSLR camera, studio-quality ring light or flash setup, and an intuitive touchscreen interface. Its key feature is the complete absence of an attendant.1. Eliminating the Intruder Factor: This is the most crucial benefit. With no attendant, the photo booth becomes a private, self-contained play zone. Guests…who are largely family and lifelong friends…feel completely uninhibited. They control the pace, the poses, and the props. The dynamic shifts from “I am being photographed by a vendor” to “I am having fun with my loved ones.” The resulting images are demonstrably more authentic, goofy, and emotionally resonant because the psychological barrier of a stranger’s gaze has been completely removed. For an intimate gathering, comfort and psychological safety are the ultimate luxuries.

    1. Unmatched Customization and High-End Output: Micro-weddings demand high-end finishes, and the modern photo booth delivers. Customization is not an afterthought; it is built into the system.
      • Bespoke Digital Design: The couple can work with the vendor to design a custom print template that matches their wedding invitations and decor perfectly. This includes personalized color palettes, fonts, and a custom monogram or hashtag at the bottom of every print strip. Even the digital “Tap to Start” screen can be personalized with a photo of the couple, ensuring a cohesive aesthetic that aligns with the rest of the high-end event design.
      • Studio-Grade Lighting: A professional ring light or strobe flash setup is designed to make everyone look their best, providing the flattering, even light that elevates the images above simple smartphone snaps. This addresses the demand for a “high-end experience”…it’s a luxury souvenir, not a quick snapshot.
      • Premium Physical Prints: The final product is often a 4×6 or classic strip printed on high-gloss, archival-quality paper using a dye-sublimation printer. These prints are immediately available, providing guests with a tangible, personalized wedding favor that doubles as a spontaneous memory of the night.
    2. The Perfect Guest Book Activity: In a small group setting, guests have the time and attention span to be thoughtful about a guest book. A photo booth transforms the guest book from a simple signature collection into a vibrant, visual keepsake. Most self-run setups offer a dual function: the software prints two copies of the photo strip…one for the guest to keep, and one to be placed immediately into a customized scrapbook alongside a handwritten message. This creates a one-of-a-kind, authentic artifact of the evening, compiled by the guests themselves in real-time.

    3. A Focused Center of Entertainment: In a micro-wedding, the entertainment must be engaging without being overbearing. A photo booth provides a dedicated activity center that guests can visit and revisit throughout the evening without pressure. It’s an icebreaker for guests who may only know the couple, and a focal point for the existing friendships. The “self-run” nature encourages collaboration as guests figure out the best poses and timing together, further building on the communal and intimate atmosphere.Making the Self-Run Booth Work

    For a couple planning a micro-wedding, implementing this high-end photo booth experience involves a few key steps to maximize its success and ensure it feels like a seamless extension of their personalized event: * Curate the Props: Ditch the dollar-store feather boas and oversized glasses. For a high-end feel, props should be carefully chosen to match the couple’s aesthetic. Think small, tasteful signage, floral headpieces that match the decor, or unique vintage masks. The quality of the props is directly tied to the perceived quality of the entire experience.
    * Optimal Placement: The booth should be strategically placed in a semi-private, but accessible, corner of the venue. It should be close enough to the main party to draw guests in, but slightly secluded to encourage the uninhibited behavior that makes for great photos. A lovely, non-intrusive backdrop…like a wall of greenery or a sleek velvet curtain…should be chosen to complement the venue.
    * Simple Instructions: Since there is no attendant, clear, elegant signage is essential. A simple sign that reads “Tap to Start” and explains the guest book process is all that is needed to keep the experience running smoothly and ensure every guest understands how to operate the high-tech equipment.The self-run photo booth is more than just a novelty; it is a thoughtful, intentional choice for the modern, intimate wedding. It successfully navigates the complex requirements of a micro-wedding by delivering a professional, luxury-grade souvenir while simultaneously protecting and enhancing the deep sense of comfort, privacy, and personal connection that is the very foundation of the intimate celebration. It proves that the biggest fun often comes in the smallest, most personal packages, and that sometimes, the best memories are created when the camera is in the hands of a friend, not a stranger.

  • AirPrint Mastery: Wireless Printing Troubleshooting

    AirPrint Mastery: Wireless Printing Troubleshooting

    AirPrint, Apple’s proprietary wireless printing technology, is designed to be the definition of effortless technology. The promise is simple: press print on your iPhone, iPad, or Mac, and the job is automatically routed to a compatible printer on your local network…no drivers, no setup, and no messy wires. This functionality, often referred to as “Auto-Print,” works flawlessly for millions of users. But when it fails…when the printer mysteriously vanishes from the selection menu or when the “Auto-Print” function simply stalls…it transforms from a convenience into a major frustration. This comprehensive technical guide is for the user who is tired of the inconsistency. We’ll move past the basics of “is the printer on?” and dive deep into the network layer, where 90% of AirPrint problems truly reside, to ensure your wireless printing is reliable, consistently visible, and executes flawlessly every single time.

    THE AIRPRINT ARCHITECTURE: WHAT’S GOING WRONG?

    To troubleshoot AirPrint effectively, you must first understand how it works. AirPrint does not use a typical networking protocol. Instead, it relies on Apple’s implementation of Bonjour (also known as mDNS, or multicast DNS).

    Bonjour is a zero-configuration networking protocol that allows devices to automatically discover services on a local area network (LAN). Your iPhone doesn’t search for the printer’s IP address; it broadcasts a request that says, “Is there an AirPrint service available?” and your printer responds, “Yes, I am here.”

    When AirPrint fails, the service is almost never the problem. The issue is almost always that the Bonjour signal is being blocked, dropped, or delayed somewhere between your device and the printer, almost always within your Wi-Fi router’s configuration. This guide focuses primarily on fixing these underlying network communication faults.

    PHASE 1: THE ESSENTIAL QUICK-FIX CHECKLIST

    Before diving into advanced networking, ensure these four fundamentals are met. These resolve about 50% of all AirPrint issues.1. THE POWER CYCLE TRIAD: The simple act of turning things off and on often clears temporary IP or Bonjour cache conflicts. Do this in sequence:

      - Turn off the printer, unplug it for 60 seconds, and plug it back in.<br />
      - Restart your main Wi-Fi router.<br />
      - Restart your iOS device or Mac.
    
    1. SOFTWARE AND FIRMWARE SYNCHRONIZATION: AirPrint is constantly updated via iOS/macOS releases. Your printer also runs firmware that supports the protocol.
      • Ensure your iPhone/iPad/Mac is running the latest OS version.
      • Check your printer manufacturer’s website or the printer’s settings menu for the latest firmware update. This is critical, as older firmware versions often have buggy mDNS implementations.
    2. NETWORK CONFIRMATION: The single most common user error is device separation.
      • Your printing device (iPhone) and your printer must be connected to the exact same Wi-Fi network (SSID). If your house has “HomeNetwork” and “HomeNetwork-Guest,” connecting to different ones will fail the Bonjour discovery.
    3. CHECK THE PRINTER’S STATUS: Ensure the printer is not stuck in a low-power “deep sleep” mode. While some printers advertise that they “wake for AirPrint,” this function can be unreliable. Disable any power-saving modes that aggressively shut down the Wi-Fi card. A printer that takes two minutes to wake up is a printer that AirPrint will time out on.PHASE 2: NETWORK DEEP DIVE (THE AUTO-PRINT KILLERS)

    This is where we address the most persistent and frustrating AirPrint failures. Access your router’s settings (usually via a web browser and an IP address like 192.168.1.1).1. WI-FI BAND ISOLATION (2.4GHz vs 5GHz)
    Many modern routers use “band steering,” where they consolidate the 2.4GHz and 5GHz networks into a single SSID. While convenient, this is often an AirPrint killer.

      - Problem: Bonjour (mDNS) is a multicast protocol. Some routers struggle to properly bridge mDNS packets between the 2.4GHz band (which printers often prefer for range) and the 5GHz band (which phones often prefer for speed).<br />
      - Solution: Log into your router and *split* the bands. Give them two distinct names (e.g., "MyNetwork-2.4GHz" and "MyNetwork-5GHz"). Connect your printer to the 2.4GHz network. Connect your printing device (iPhone/Mac) to the *same* 2.4GHz network. This ensures all traffic is within the same band, maximizing Bonjour reliability.
    
    1. ACCESS POINT (AP) ISOLATION AND GUEST NETWORKS
      This is the most frequent cause of “printer not found” errors.

      • Problem: Router security features like AP Isolation (sometimes called Client Isolation) or Guest Network Mode prevent devices connected to the Wi-Fi network from seeing each other. This is great for security but completely blocks Bonjour discovery.
      • Solution: Ensure AP Isolation is disabled on your main network. Never connect your printer to a dedicated “Guest Network,” as these are designed to prevent device-to-device communication.
    2. FIREWALL AND MULTICAST CONTROL
      Your router’s internal firewall may be aggressively blocking multicast traffic.

      • Problem: Bonjour/mDNS uses UDP port 5353. If your router has a configurable internal firewall or a setting called “Multicast Control” or “IGMP Snooping,” it might be restricting this traffic. IGMP Snooping, in particular, is meant to reduce network chatter but often overzealously filters Bonjour packets.
      • Solution: Look for a setting in your router’s Wireless or Advanced Networking section labeled “IGMP Snooping” or “mDNS Relay.” If found, try disabling IGMP Snooping. If your router has an “mDNS Relay” feature, ensure it is enabled to properly pass traffic between different network segments or bands.
    3. PRINTER IP ADDRESS MANAGEMENT (DHCP RESERVATION)
      An inconsistent IP address can cause an “Auto-Print” failure after a week of working fine.

      • Problem: Every time your printer restarts, your router’s DHCP service gives it a new IP address. Your iPhone may have an old, cached IP address for the printer, causing connection attempts to fail when the printer’s address changes.
      • Solution: Log into your router’s settings and locate the DHCP Reservation section. Find your printer (by its MAC address, usually listed in the printer’s network status report) and assign it a permanent, static IP address. This ensures that the printer always has the same address, greatly improving the reliability of the Bonjour service.PHASE 3: THE “FLAWLESS AUTO-PRINT” CHECKLIST

    Once the network foundation is stable, focus on the device and printer consistency.1. CLEANING THE AIRPRINT CACHE (MAC ONLY)
    On a Mac, a corrupted print queue can prevent AirPrint from seeing any printers.

      - Steps: Go to System Settings (or System Preferences) > Printers &#038; Scanners. Right-click in the empty space of the printer list. Select "Reset Printing System..." This deletes all existing printers and print jobs and clears the system's AirPrint cache, forcing a fresh, clean discovery. *Warning: You will have to re-add all printers.*
    
    1. PRINTER PLACEMENT AND WI-FI STRENGTH
      A weak Wi-Fi signal will cause AirPrint to fail consistently, as Bonjour discovery packets are small and easily lost.

      • Place the printer as close as reasonably possible to the main Wi-Fi router or an access point.
      • If you are using a Wi-Fi extender, ensure the extender is configured in “bridge” or “access point” mode and not a separate “repeater” mode. An incorrectly configured repeater can often block Bonjour traffic.
    2. BLUETOOTH INTERFERENCE
      While AirPrint is a Wi-Fi protocol, many printers use Bluetooth Low Energy (BLE) for the initial, quick setup process.

      • Temporarily disable Bluetooth on your Mac or iPhone. If the printer appears and works, the printer’s BLE radio may be conflicting with its Wi-Fi card. This requires a firmware update or a setting change on the printer itself.HARDWARE AND PRINTER RECOMMENDATIONS (CANON SELPHY EXAMPLE)

    The reliability of AirPrint heavily depends on the quality of the printer’s network hardware. Cheaper printers often have very basic network chips that struggle with multicast traffic and aggressive power-saving. For the most consistently flawless AirPrint experience, look for a printer that is certified for AirPrint 2.0 or newer. – Canon Selphy CP Series: These are excellent examples of reliable, compact AirPrint devices. While they are specialized for 4×6 photo printing, the Selphy (like the Canon Selphy CP1500) often uses a more robust Wi-Fi implementation because its primary function is mobile/wireless photo transfer. For a junior writer needing quick, tangible results or a user who needs reliable photo proofing, the Selphy line offers extremely dependable connectivity, making the “Auto-Print” function nearly instantaneous.

    • Key Features to Look For in a New Printer:
      • Dual-Band Wi-Fi: Printers with both 2.4GHz and 5GHz radios often have a more sophisticated network interface controller (NIC) that handles mDNS bridging better.
      • Epson and HP High-End Models: While all major brands support AirPrint, the higher-tier business or photography models from HP and Epson usually have better processors and network cards, leading to faster wake times and more consistent discovery.
    • Why AirPrint is Superior to Other Apps: Resist the urge to use a manufacturer’s proprietary printing app (e.g., HP Smart, Epson iPrint) as a workaround. While these apps can sometimes force a print job through, they bypass the Bonjour protocol, meaning you lose the “Auto-Print” functionality directly from standard applications like Safari, Photos, and Mail…which is the entire point of AirPrint Mastery.FINAL THOUGHTS: MAINTENANCE AND CONSISTENCY

    Mastering AirPrint is fundamentally about mastering your home network. By implementing a static IP address for your printer and ensuring your router’s settings (especially AP isolation and IGMP Snooping) are not blocking multicast traffic, you address the root causes of nearly all wireless printing frustration.

    AirPrint is a low-maintenance technology, but it does require a perfectly tuned Bonjour channel to remain flawless. Make it a habit to check for printer firmware updates every six months, and, most importantly, commit to connecting all your Apple devices and your printer to the same Wi-Fi band. Once configured correctly at the network level, you can finally enjoy the true convenience of “Auto-Print” where the printer simply appears, and the job always finishes, reliably and effortlessly.

  • From Broadway to Your Backyard: The Evolution of Access

    From Broadway to Your Backyard: The Evolution of Access

    The distance between “Broadway” and “your backyard” once measured not just geography, but a vast and unbridgeable chasm of access, cost, and expertise. This is the story of how photography…the single most powerful tool for capturing and curating human life…has been thoroughly democratized, moving from a monumental, fixed destination to a feature as fluid and personal as the breath in your lungs. In 1925, the idea of instantaneous, portable image-making was a future so distant it was science fiction. If you wanted a professional portrait, a memory fixed for posterity, or a casual photo booth snap with a friend, you undertook a pilgrimage. You went to the dedicated space, the photo studio, the kinetoscope parlor, or the specialized booth…the commercial, cultural ‘Broadway’ of image capture.

    That experience was defined by its friction. The process was expensive, reserved for special occasions, and required a surrender of agency. You dressed for the event. You waited your turn. You were positioned by a professional who understood the temperamental chemistry and the unforgiving physics of light and shadow. The resulting picture was a precious artifact, a heavy cardstock portrait or a handful of grainy, monochromatic photobooth strips, meant for an album, a locket, or a mantelpiece. It was a formal contract with history, carefully negotiated and rarely executed. The financial and time investment meant that the common experience of life…the mundane, the silly, the spontaneous, the ugly…was deemed unworthy of documentation. A photograph was an investment, a performance, and a luxury.

    This high barrier to entry created a cultural monopoly on visual storytelling. The narrative of the era was predominantly captured by those with resources, equipment, and training: journalists, artists, and the wealthy. The visual historical record of the early 20th century is, by necessity, a curated, elevated, and sometimes stiflingly formal one. The average person’s life existed mostly in memory, not on paper. The booth was stationary, the technology was complex, and the power remained concentrated.

    The first crack in this monolithic structure came not from digital technology, but from ingenious simplification. The introduction of roll film cameras…the Kodak Brownie being the most famous evangelist…began to pull the practice out of the studio and into the sun. The tagline, “You press the button, we do the rest,” was a revolutionary declaration of photographic independence. It severed the photographer from the chemist, placing the ability to capture the image in the hands of the public while the complex, darkroom work remained with the professionals. This made photography a leisure activity rather than a profession. People began taking pictures of holidays, family gatherings, and everyday scenes. The aesthetic shifted from formal portraiture to the candid snap, embracing the slightly blurry, slightly off-kilter perspective of the amateur. But even then, the friction remained significant: the cost of film, the limit of twelve or twenty-four exposures, the anxious wait for development, and the final cost of the prints. The booth had been moved from Broadway to the living room, but it was still a finite resource.

    The true, cataclysmic shift, the one that fully unlatched the booth and placed it in the pocket of every global citizen, was the advent of digital technology and, crucially, the smartphone. This eliminated all remaining forms of friction simultaneously. It was a quadruple-whammy of democratization: cost, time, skill, and sharing.

    First, the cost per picture dropped to zero. There is no film, no development fee, and essentially infinite storage capacity. This single change…the total removal of economic consequence for hitting the shutter button…was the engine of the modern visual age. It encouraged a philosophy of documentation that is fundamentally different from the past. Why take one picture when you can take fifty? Why save the camera for a birthday when you can use it to capture the pattern of morning shadows on your coffee cup? The photograph became a throwaway note, a fleeting text message, an experimental draft.

    Second, the skill barrier collapsed. Sophisticated algorithms now manage light, focus, color balance, and exposure automatically, often producing technically superior images to those taken by all but the most dedicated professional of fifty years ago. The modern camera is not a tool you operate; it is a smart partner you simply point. With a tap, you can edit, crop, and filter the image, bypassing years of darkroom expertise and Adobe Photoshop mastery. The photographer, the developer, the editor, and the publisher are all now one and the same person, armed with a single device.

    Third, the mobility and time factor achieved totality. The camera is no longer a dedicated device left in a drawer, but a fused extension of the self, carried in the pocket at all times. The opportunity to capture a moment is instantaneous and unmissable. That pivotal moment, that perfect intersection of light and emotion, is no longer lost because the photographer was blocks away from the nearest booth, or fumbling with a film canister. The booth is always, constantly, right there, waiting.

    Finally, sharing became instant and global. The digital image is born connected. It does not exist merely as a physical object; it exists as a data stream capable of transmission to millions of people in a fraction of a second. The physical distance between “my backyard” and “your backyard” has been obliterated, replaced by the immediacy of the Instagram feed, the TikTok video, and the FaceTime call. The photograph has evolved from a precious artifact to a language of communication, a primary verb in the syntax of global digital culture.

    The ramifications of this shift are profound and complex. On one hand, the accessibility has led to an explosion of human history and creativity. We have an unprecedented record of the collective human experience…from high political drama to the intimate moments of family life, all contributed by billions of independent witnesses. Subcultures, protests, personal joys, and mundane reality are all recorded, archived, and shared. This democratization has given voice to countless communities and perspectives previously absent from the official, professionally curated visual record. The power of the image as a tool for political change, emotional connection, and self-definition has never been higher.

    On the other hand, this total accessibility has led to a counter-cultural reaction. When every picture is technically perfect and instantly available, the value of perfection diminishes. The infinite access has created a new kind of friction…the cultural friction of authenticity. When every image is filtered, posed, and algorithmically enhanced, there arises a craving for the grit and reality that defined the friction-filled photography of the past. The rise of trends that deliberately mimic the flaws of early photography…the harsh, unflattering direct flash, the grainy, disposable camera aesthetic, the ‘lo-fi’ digital noise…is not a rejection of the technology in our pocket. It is a rebellion against its perfection. It is a nostalgic longing for the raw, unplanned honesty that came as a necessary side effect of the technical limitations of the 1925 ‘Broadway’ experience. We deliberately reintroduce friction to prove an image is ‘real.’

    The journey from Broadway to your backyard is more than a technological success story; it is a profound cultural transformation. The photography booth has been unshackled, its walls dissolved, its processes internalized by a chip and an algorithm. The picture has evolved from a luxury good to a universal utility. It is no longer an object we occasionally seek out, but a power we wield constantly. The greatest achievement of the modern camera is not that it takes beautiful pictures, but that it has become an invisible extension of human sight…a limitless, ever-present device that has made the visual memory of the world instantly accessible to everyone, everywhere. The booth is truly in your pocket, and with it, the power to define and share your own history, moment by moment.

  • Classroom Chronicles: Photo Booths for Teachers

    Classroom Chronicles: Photo Booths for Teachers

    The secret to a dynamic and unforgettable classroom isn’t just in the lesson plan; sometimes, it’s in the unexpected moments of fun that fuse creativity with core learning objectives. For years, teachers have sought simple, high-impact ways to make their students the stars of their own educational journey. Enter the unsung hero of modern classroom engagement: the digital photo booth, specifically engineered for the unique environment of a school setting.

    For teachers juggling administrative tasks, grading, and the relentless need to keep lessons fresh, the idea of setting up a complex media station sounds like a burden. This is where ZillaBooth changes the game. Unlike professional, cumbersome photo applications, ZillaBooth was designed with a single, clear goal for educators: make it incredibly simple and robust enough for even the youngest learners to operate independently. The result is a powerful tool that transforms ordinary classroom moments…from the first bell of the year to complex student-led projects…into high-quality, instantly shareable memories and compelling educational artifacts.The Perfect Start and Finish: First and Last Day of School Memories

    Every academic year is a journey, and teachers are the first people their students meet on that path. The “First Day of School” photo is a treasured tradition, but managing thirty students, ensuring good lighting, and taking individual pictures can be a logistical headache.

    Using ZillaBooth simplifies this memory-making tradition down to a science. You don’t need a complicated DSLR setup or a student volunteer with a shaky hand. Teachers can set up an iPad or tablet running the ZillaBooth app on a simple stand in the corner of the classroom. The interface is dominated by a single, massive, clearly labeled button that says “Take Photo” or “Start.” This simplicity is key. A nervous kindergartner or a fidgety third-grader can walk up, select their digital or physical prop, and press the button without needing detailed instructions. The software handles the countdown, the flash (if needed), and the automatic saving of the image into a designated, secure folder.

    This setup isn’t just about speed; it’s about consistency and quality. The teacher can pre-set the background or template…perhaps a branded “Welcome to Third Grade!” frame…and every single picture taken will have the same polished, professional look. This uniformity is a dream for teachers creating class newsletters or Yearbooks. As the year progresses, the same easy process can be used for the “Last Day of School” photos, creating a stunning visual timeline that captures the growth and change in each student over nine months. Parents genuinely love this simple gift, and it requires virtually zero effort beyond the initial five-minute setup.Beyond Memories: Empowering Student-Led Projects

    The real educational power of ZillaBooth is unleashed when it moves from a teacher-operated tool to a student-driven creation station. The simplicity that makes it great for “First Day” photos is precisely what makes it an invaluable resource for student projects across all subjects and grade levels. When a tool is complex, students focus on mastering the tool; when it’s simple, they focus on the content.Digital Storytelling and Character Interviews

    Imagine a language arts class working on a unit about historical fiction. Instead of a standard book report, students are tasked with becoming a character from their novel. The ZillaBooth setup becomes their low-barrier recording studio. A student can put on a simple costume or hold a relevant prop, step into the frame, and, using the simple video recording mode, deliver a two-minute “interview” as the character. * The Problem: Traditional video recording involves confusing settings, long upload times, and complex editing software.
    * The ZillaBooth Solution: Students simply tap the “Video” mode, press “Start,” and the recording begins. The files are instantly and clearly saved. The lack of complex editing options is a feature, not a bug, as it forces students to focus on clear, concise presentation and improvisation, key public speaking skills.Making Social Studies Come Alive

    History comes alive when students step into the shoes of the past. For a unit on the American Revolution, a group of fifth graders could use the booth to create a series of “Wanted” posters for historical figures. They take a high-contrast photo using a preset filter in ZillaBooth, print it out, and then hand-draw the historical context onto the printed image. For a high school class, students might use the video mode to create short, mock “news reports” from the front lines of a historical event, using a green screen backdrop (easily managed by the software) to superimpose a setting from the time period. The uncomplicated nature of the app ensures that the 18th-century powdered wig or the solemnity of the Gettysburg Address isn’t lost in a technical struggle.STEM and Visual Documentation

    Even in science and mathematics, ZillaBooth can be used for visual documentation. For a physics class working on a presentation about trajectory, the students can use the rapid-fire burst mode to capture a sequence of a projectile launch, using the resulting images for slow-motion analysis in their report. In a biology class, a student could record a time-lapse video of a plant growth project, using the device’s consistent framing to ensure the final product is clean and professional. The easy file management and instant saving mean less class time wasted on troubleshooting and more time spent on the actual learning.The Pedagogical Pillars: Why This Works

    The classroom photo booth is more than just a novelty; it is supported by sound educational principles.1. Increased Engagement and Ownership: When students are actively involved in the creation of media, their investment in the topic skyrockets. The chance to be physically “on camera” provides a powerful motivational hook. It turns passive information consumption into active, performative learning.
    2. Developing Digital and Presentation Literacy: In the modern economy, the ability to present information clearly and professionally is non-negotiable. ZillaBooth offers a safe, structured environment for students to practice these critical skills. They learn about framing, lighting (even simple phone flash use), and the importance of a clean final product without the intimidation of professional-grade software.
    3. Fostering Collaboration: Whether a group is staging a historical scene or designing a photo template, the booth becomes a hub of collaborative activity. Students must communicate, assign roles, give feedback, and work together to achieve a high-quality visual outcome, reinforcing teamwork skills.
    4. Accessibility and Equity: Traditional media projects can be hampered by access to high-end devices or software. Because ZillaBooth runs efficiently on standard, common school-provided tablets and smartphones, it levels the playing field. The simple interface also makes it accessible for students with diverse learning needs or those who struggle with fine motor skills required for more complex apps. The large buttons and clear visual feedback minimize frustration and maximize successful interaction.The Teacher’s Quick Setup Guide

    Getting your ZillaBooth station operational is designed to be a one-time setup that takes less than five minutes.

    1. The Hardware Base: You only need a stable tripod or stand for a tablet or phone and a secure power source. Positioning is everything: choose a corner with decent ambient light, though the app’s ability to force the flash means low light is not a barrier to quality.

    2. The Backdrop Strategy: Keep it simple. A seamless roll of colored paper (e.g., black or white) tacked to the wall works perfectly. Alternatively, for next-level projects, utilize the built-in green screen functionality by hanging a simple piece of green fabric. ZillaBooth handles the digital substitution effortlessly.

    3. The App Settings: Lock it Down: The teacher’s secret weapon is ZillaBooth’s ability to lock the interface. Once you set the mode (Photo, Video, or GIF) and select the desired template or filter, you can lock the screen so students can only see the main “Start” button. This prevents accidental setting changes and keeps the workflow focused and reliable, even through multiple class periods.

    4. Prop Organization: Physical props (silly hats, oversized glasses, speech bubbles on sticks) should be stored in a labeled bin next to the booth. For digital props, pre-load ZillaBooth with classroom-relevant overlays (e.g., graduation caps for a career day, molecule diagrams for a chemistry assignment).Next-Level Classroom Ideas| Grade Level | Core Subject | Project Idea | ZillaBooth Feature Used |
    | :————– | :————— | :——————————————————————————————————————————————————————————- | :——————————————— |
    | K-2 | ELA/Reading | The Book Reviewer: Students stand next to a printed book cover and give a short, one-sentence video review of the book they just read. | Simple Video Mode, Large Start Button |
    | 3-5 | Social Studies | Historical Figure Reenactment: Students dress as a famous explorer or pioneer and record a short video “diary entry” from their journey. | Background Green Screen, Video Countdown |
    | 6-8 | Science | Ecosystem Models: Students create a miniature ecosystem and use the Time-Lapse mode to show a week’s worth of change, then add the resulting clip to their presentation. | Time-Lapse Function, Auto-Save to Folder |
    | 9-12 | ELA/Art | Poetry or Theatrical Monologue: Students use the photo booth area to record a dramatic reading, experimenting with high-contrast Filters to match the mood of the text. | High-Resolution Photo, Manual Filter Selection |
    The modern classroom is a dynamic place that demands engaging tools capable of keeping pace with student curiosity and technological expectations. By integrating the simple, student-friendly power of ZillaBooth, teachers aren’t just adding a fun gadget to their room; they are fundamentally simplifying the process of high-quality memory creation and transforming the way students capture, create, and communicate their learning. The focus shifts from the complexity of technology to the unlimited potential of the student’s imagination. It’s time to move the desk out of the corner, set up a backdrop, and let the classroom chronicles begin.