
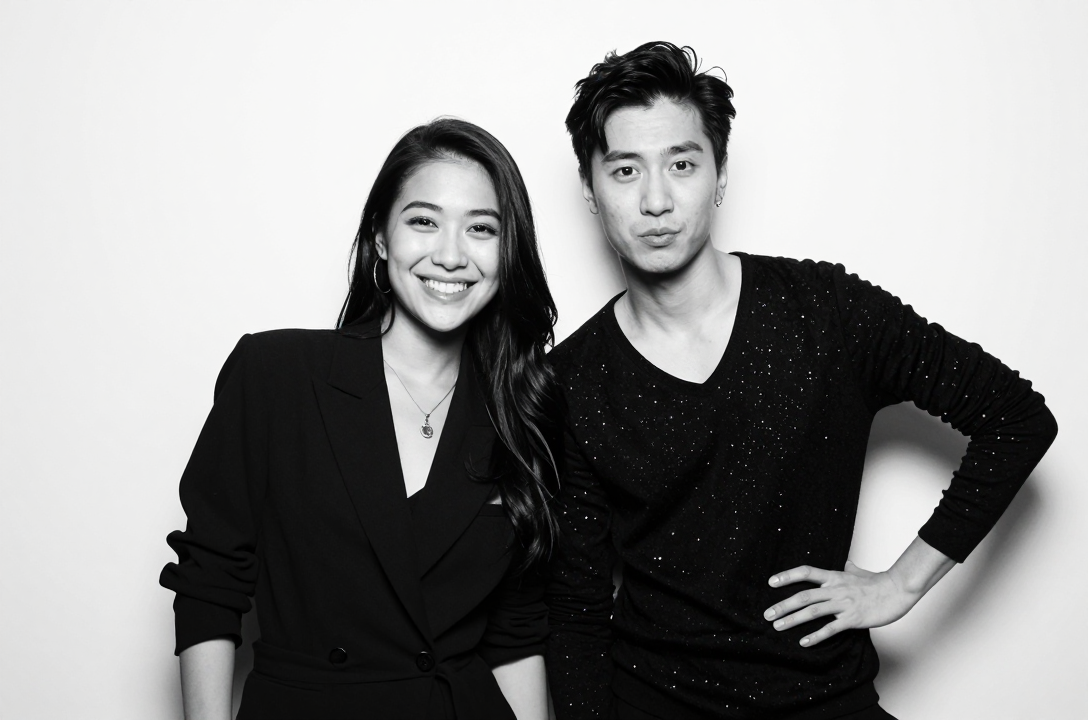
The quest for the perfect photo booth experience has evolved far beyond novelty props and goofy faces. Today’s event hosts, brands, and party planners are chasing a single, dominant aesthetic: the “Glam Booth.” Synonymous with A-list celebrity events, high-fashion editorials, and, yes, the signature black and white, impossibly flawless photos favored by the Kardashian-Jenner family, this look has become the gold standard for premium, high-end photo activations.
It’s not just a filter; it’s a meticulously crafted lighting setup combined with specific post-processing to create a timeless, studio-quality portrait in a fraction of a second. The good news? You don’t need a multi-million dollar studio budget to achieve it. With the right foundational elements…a white backdrop, specific lighting, and the powerful manual controls available in ZillaBooth…you can replicate this coveted, high-contrast, black-and-white masterpiece for any event. This guide will take you step-by-step from zero to flawless, ensuring your ZillaBooth captures that iconic, magazine-cover quality every time.
The Anatomy of A-List Flawlessness
To fake the perfect Glam Booth, you must first understand its core components. The aesthetic is built on three non-negotiable pillars:1. High-Contrast Black and White Conversion: This is what gives the image its timeless, luxurious feel. The absence of color forces the viewer to focus on light, shadow, and texture. Crucially, the conversion isn’t flat; it’s punchy. The blacks are deep and inky, the whites are bright, and the mid-tones are crisp.
2. Shadow-Eliminating Lighting: The goal of this lighting setup is not drama. It is the antithesis of the harsh “paparazzi aesthetic.” Here, we want to virtually eliminate all harsh shadows, especially under the eyes, chin, and nose. The light must be large, soft, and wrap evenly around the subject. This even illumination is the real secret to the “smoothing” effect.
3. Flawless Post-Processing: This is where ZillaBooth comes in. The final layer is a subtle, yet essential, skin-smoothing or ‘beauty’ filter. This step reduces blemishes, softens fine lines, and evens out skin tone, completing the hyper-real, airbrushed look that defines the aesthetic.Part One: The Essential Foundation…The White Backdrop
A professional studio look demands a professional backdrop. The white backdrop is more than just a canvas; it’s a critical part of the lighting system.
Why White is Non-Negotiable: * Light Spill and Reflection: A white backdrop acts as a giant, soft reflector. When your main light hits the subject, some light continues onto the white background and then bounces back onto the subject. This fill light is what subtly opens up the shadows on the dark side of the face, contributing significantly to the overall smoothing effect.
* High-Key Separation: In black and white photography, contrast is everything. A properly lit white background should appear bright, almost pure white, which makes the (darker-toned) subject pop forward. This creates a clean, elegant separation that looks instantly professional.
* The Seamless Look: For the “Kardashian” look, you must use a seamless white backdrop. This usually means a roll of photography paper or a tension-fabric pillowcase backdrop stretched taut on a frame. Never use sheets, curtains, or wrinkled materials, as the light will pick up every crease, ruining the illusion of perfection.Setup Tip: Place your backdrop at least 3-4 feet behind your subject’s final position. This distance is vital for keeping stray shadows off the background and allowing the backdrop to be lit separately if necessary (though often the light spill from the main subject light is enough).
Part Two: Mastering the Light…The Smoothing Power
This is the most critical and most misunderstood step. For this aesthetic, you need one large, soft light source that is placed close to the subject and is aimed straight-on or slightly to one side.
The Ideal Lighting Choices:1. The Ring Light (The Classic Choice): The most common and effective tool for a Glam Booth. A large (18-inch or greater) LED ring light is placed directly in front of the subject, and the ZillaBooth unit or camera is placed right in the center of the ring.
* Why it works: This setup provides perfectly even, shadowless illumination. The light hits the face from all angles simultaneously, filling in every shadow and wrinkle. It also creates that signature, flattering circular catchlight in the eyes.
2. The Large Softbox or Strip Light (The Professional Choice): For a more sophisticated look, use a large softbox (at least 24×36 inches) or a tall strip light (9×36 inches).
* Placement: Position the softbox 45 degrees to the left or right of the camera and tilt it down slightly.
* Why it works: This creates a beautiful, large source of light that ‘wraps’ around the subject’s face. It still eliminates harsh shadows but provides a slightly more dimensional look than a flat ring light, giving a subtle contour that the B&W conversion will emphasize.Pro Tip on Power: The light source must be powerful enough to be the dominant source of illumination in the room. This ensures consistency and prevents environmental light (like yellow overhead lamps) from contaminating the white balance.
Part Three: ZillaBooth…Your Digital Darkroom
Once the hardware is set, the magic happens inside ZillaBooth. You need to pre-set the application to capture and process the image in a specific, high-end way. Forget ‘Auto’ settings; we are locking in the perfect exposure and applying the proprietary ‘Glam’ effects.
Step 1: Lock the Exposure (Manual Control is Key)
In ZillaBooth’s settings, locate the manual exposure controls. * Shutter Speed: Set this high (e.g., 1/125th or 1/160th of a second). Since you are using a dedicated light source (ring light or strobe), you need to ensure the fast shutter speed eliminates any motion blur from the subject and only captures the flash’s light.
* ISO: Keep this low (e.g., ISO 100 or 200). A low ISO prevents image noise (grain), which is critical for that flawless, smooth finish.
* Flash Control: Ensure your light is triggering reliably with ZillaBooth’s external flash sync or, if using a constant LED ring light, simply lock the exposure based on that constant light.Step 2: Activate the “Studio B&W” Filter
ZillaBooth offers various B&W conversion options. For the high-contrast Glam look, select the Studio B&W or High-Contrast Monochrome profile. This profile automatically boosts the clarity and contrast, deepening the shadows and brightening the highlights.
Step 3: The Secret Sauce…The Smoothing Slider
The most defining feature of this aesthetic is the flawless skin. In ZillaBooth’s real-time filter panel, locate the ‘Beauty/Smoothing’ slider. * The Right Level: Do not max this out. Excessive smoothing looks artificial and plastic. Set the slider to a moderate level (e.g., 50-60%). This is enough to blur minor imperfections and even out skin tone without removing all natural texture. The combination of the smooth lighting and this subtle software smoothing is what delivers the final, airbrushed result.Step 4: Lock and Save the Template
Save this entire configuration…exposure, B&W filter, and smoothing level…as a reusable template (e.g., “Kardashian Glam Template”). This ensures every photo taken during the event is perfectly consistent.
Step-by-Step Execution Guide for Event Day1. Check the Background: Before the event starts, take a test shot of the empty backdrop. The white should be pure white, with no shadows or gray areas. If the background looks gray, increase the power of your main light or move the subject closer to the light source.
2. Test the Posing Spot: Have a friend or model stand exactly where the guests will stand. Pay close attention to the shadows under the chin and under the eyebrows. If there are shadows, the light is too high or not large enough. Adjust the light’s height until the shadows disappear.
3. Review the Output: Take three test photos. Review them on a large screen:
* Contrast Check: Are the blacks truly black, and the whites truly pure white?
* Flawlessness Check: Does the smoothing look natural but effective?
* Consistency Check: Does the subject look consistently lit across all three frames?
4. Coach Your Guests: Unlike a standard photo booth, the Glam Booth look is often enhanced by specific posing. Encourage guests to:
* Look straight at the camera/light.
* Use a slight ‘squinch’ (slightly squinting the eyes) for a confident, editorial look.
* Turn their body 45 degrees but keep their face toward the lens. This instantly makes them look slimmer and more dynamic.Pro Tips for Next-Level Glam * Accessorize with Light: Encourage guests to wear reflective jewelry (sequins, large earrings, metallic fabrics). The powerful, close light source will reflect dramatically off these elements, creating sparkly highlights that look sensational in high-contrast black and white.
* Matte is Better (For Skin): Advise guests that a touch of setting powder can work wonders. The smoothing effect works best when there is no high-shine oil on the skin, which can sometimes ‘blow out’ or over-brighten under the direct studio light.
* Use the Vignette Tool: For a final, editorial touch, apply a subtle, dark vignette using ZillaBooth’s effects panel. This subtly darkens the edges of the frame, drawing the viewer’s eye even more powerfully into the perfectly lit center subject and increasing the sense of drama and luxury.The Glam Booth aesthetic is the ultimate expression of modern, high-end event photography. It’s an investment in the guest experience, providing a premium takeaway that feels less like a party snap and more like a commissioned portrait. By combining the physical foundation of the seamless white backdrop and soft, shadow-killing light with the digital precision of ZillaBooth’s manual exposure and smoothing filters, you are no longer ‘faking it.’ You are creating a professional-grade photo booth experience that genuinely lives up to its A-list inspiration. Now go forth, and make every shot flawless.